Quantcast
Channel: Shazwazza
Viewing all 183 articles
Browse latest View live

Articulate 4.0.0 released for Umbraco version 8

$
0
0

It’s finally out in the wild! Articulate 4.0.0 is a pretty huge release so here’s the rundown…

Installation

As a developer, my recommendation is to install packages with Nuget

PM > Install-Package Articulate -Version 4.0.0

If you install from Nuget you will not automatically get the Articulate data structures installed because Nuget can’t talk to your live website/database so once you’ve installed the package and run your site, head over to the “Settings” section and you’ll see an “Articulate” dashboard there, click on the “Articulate Data Installer” tile and you’ll get all the data structures and a demo blog installed.

Alternatively you can install it directly from the Umbraco back office by searching for “Articulate” in the Packages section, or you can download the zip from https://our.umbraco.com/packages/starter-kits/articulate/ and install that in the Umbraco back office. If you install this way all of the data structures will be automatically installed.

Upgrading

I have no official documentation or way of doing this right now 😉. I’ve written up some instructions on the GitHub release here but essentially it’s going to require you to do some investigations and manual updates yourselves. There’s very little schema changes and only small amount of model changes so it shouldn’t be too painful. Good luck!

(note: I have yet to give it a try myself)

Support for Umbraco 8

I think it will come as no surprise that Articulate 4.0.0 is not compatible with any Umbraco v7 version. Articulate 4.0.0 requires a minimum of Umbraco 8.0.2. Moving forward I will only release more Articulate 3.x versions to support v7 based on community pull requests, my future efforts  will be solely focused on 4.x and above for Umbraco 8+.

Theme, Features + Bug fixes

There are several nice bug fixes in this release including a few PR sent in by the community – THANK YOU! 🤗

As for features, this is really all about updating the Themes. Previously Articulate shipped with 6 themes and all of them had a vast range of different features which I never really liked so I spent some time enhancing all of the ones I wanted to keep and made them look a bit prettier too. I’ve removed my own “Shazwazza” theme since it was way outdated to my own site here, plus I don’t really want other people to have the exact same site as me ;) But since that was the most feature rich theme I had to upgrade other ones. I also removed the old ugly Edictum them… pretty sure nobody used that one anyways.

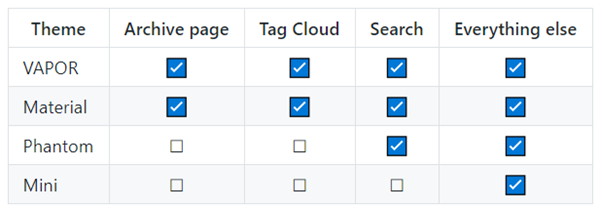
Here’s the theme breakdown (it’s documented too)

image

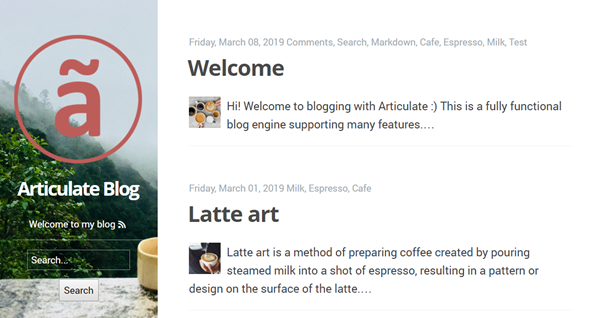
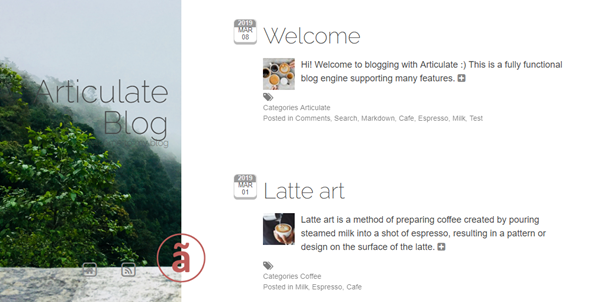
I’ve also updated the default installation data to contain more than one blog post and an author profile so folks can see a better representation of the blog features on install. And I updated the default images and styling so it has a theme (which is Coffee ☕) and is less quirky (no more bloody rabbit or horse face photos 😛)

Here’s the breakdown of what they look like now…

VAPOR

This is the default theme installed, it is a very clean & simple theme. Originally created by Seth Lilly

theme-vapor

Material

This is based of of Google's material design lite and is based off their their blog template.

theme-material

Phantom

Original theme for Ghost can be found here: https://github.com/Bartinger/phantom/. A nice simple responsive theme.

theme-phantom

Mini

The original author's site can be found here: http://www.thyu.org/www/ but unfortunately their demo site for the Ghost theme is down. The theme's repository is here https://github.com/thyu/minighost.

theme-mini


Hope you enjoy the updates!


How to register MVC controllers shipped with a class library in ASP.NET Core

$
0
0

In many cases you’ll want to ship MVC controllers, possibly views or taghelpers, etc… as part of your class library. To do this correctly you’ll want to add your assembly to ASP.NET’s “Application Parts” on startup. Its quite simple to do but you might want to make sure you are not enabling all sorts of services that the user of your library doesn’t need.

The common way to do this on startup is to have your own extension method to “Add” your class library to the services. For example:

public static class MyLibStartup
{
    public static IServiceCollection AddMyLib(this IServiceCollection services)
    {
        //TODO: Add your own custom services to DI

        //Add your assembly to the ASP.NET application parts
        var builder = services.AddMvc();
        builder.AddApplicationPart(typeof(MyLibStartup).Assembly);
    }
}

This will work, but the call to AddMvc() is doing a lot more than you might think (also note in ASP.NET Core 3, it’s doing a similar amount of work). This call is adding all of the services to the application required for: authorization, controllers, views, taghelpers, razor, api explorer, CORS, and more… This might be fine if your library requires all of these things but otherwise unless the user of your library also wants all of these things, in my opinion it’s probably better to only automatically add the services that you know your library needs.

In order to add your assembly application part you need a reference to IMvcBuilder which you can resolve by calling any number of the extension methods to add the services you need. Depending on what your application requires will depend on what services you’ll want to add. It’s probably best to start with the lowest common feature-set which is a call to AddMvcCore(), the updated code might look like this:

//Add your assembly to the ASP.NET application parts
var builder = services.AddMvcCore();
builder.AddApplicationPart(typeof(MyLibStartup).Assembly);

From there you can add the other bits you need, for example, maybe you also need CORS:

//Add your assembly to the ASP.NET application parts
var builder = services.AddMvcCore().AddCors();
builder.AddApplicationPart(typeof(MyLibStartup).Assembly);

Finding success in OSS

$
0
0

I’ve been working in open source for quite some time and wanted to share some of my experiences in regards to managing OSS projects and communities. I’ve been employed by Umbraco, an open source .Net based CMS, for over 7 years (wow! where has the time gone!?) and have been working with the Umbraco project for even longer. In the past 10 years I’ve also started a number of my own OSS projects, seen many other colleagues and companies do the same, seen many get stalled, sometimes fail, sometimes succeed and more rarely, actually thrive. We’ve seen an enormous rise in the OSS take-up within the .Net world in the past few years thanks to Microsoft really embracing and encouraging open source and the communities that make it work. But OSS is not an easy or straightforward task. So how does an open source project succeed? … I unfortunately don’t have a straightforward answer for that either but I would like to share some insight based on my own experience.

The main reason I’ve mentioned Umbraco is because it is one of these rarer open source projects that has actually thrived and it’s quite exciting to be part of such a large worldwide community. So how have they made it work? Like many other Umbraco community members, I started using it many moons ago, working in agency land and wanting a .Net based open source CMS. At that time, it turned out that this was really the only one out there that seemed to do the job. For me, what made this project so exciting back then was how easy it was to help make the software better. It was easy to submit patches, it was easy to get feedback on issues and proposed features, it was easy to get in touch with other community members and what was really great was that it didn’t take long for your fixes or features that you submitted to be part of a new release. This was all back before GitHub or even Git existed so all of this communication was done in email or on custom built forums, but it still worked. Skip ahead to today and the underlying principles that still make this project exciting haven’t changed, it’s now just infinitely easier to do all of these things with better tools. The community of Umbraco is what makes this project tick, it has always been the main focus of the project and with community growth, the software and ecosystem thrive.

But it’s free! … so how am I employed??

This is the most common question I get asked about working for an open source project. When I started, I had no idea how to make an open source project sustainable along with having paid employees and I was equally intrigued. Umbraco offered a few services and products that were paid in order to be able to pay full time staff members and keep the project growing. These were things like various levels of certified training courses, add-on licensed products and paid support plans. Today the story for Umbraco is similar and includes all of these things but now also includes subscription models for Software as a Service called Umbraco Cloud which helps to continue the cycle of re-investing into growing the community and the project.

Most OSS projects are made by individuals

But … most OSS projects are tiny and are run by a single person who is the sole developer on a project who dedicate their own time to writing and maintaining it. A lot of this time will be used to help people: investigating issues, answering questions, writing documentation, fixing bugs, releasing new versions, etc… and all of this is done for Free but these are the things that make a project successful. It is actually quite difficult to create a community that re-invests their time into helping write your software rather than just using your software. If you can convince one or more developers to get on board, you’ll then need to invest more of your time in reviewing code, documentation updates, bug fixes and features created by your community. This time is critical, you want to be able to provide feedback and to integrate your communities changes as fast as possible… this is what will help keep your community re-investing their own time in growing the project and hopefully drumming up support for even more developers to chip in.

In my experience, this is where most OSS projects plateau because the project’s founder doesn’t have enough time to manage it all. This generally leaves projects in a semi-stalled state and may end up losing active developers and community members since their pull requests and submitted issues will remain pending for too long. These projects will ebb and flow, developers get busy and then may be re-inspired to find some more time. This doesn’t mean these projects are unsuccessful and it is probably the state of most OSS projects out there.

So how do you keep a project’s momentum?

I try to keep my own projects ‘active’ by answering questions, reviewing PRs and releasing new versions as often as I can… but in reality, this doesn’t happen as often as I would like. Sometimes I get re-inspired and may invest my evenings or weekends on some features but ultimately, I don’t think this is sustainable if you do want your OSS project to become community driven. One of the first OSS projects I created was called “uComponents” which was a collection of plugins for Umbraco and I did something with that project that I haven’t done with any of my other ones – I asked another community member to take over the project. This meant providing write access to the code but more importantly trusting another developer to help move the project forward. Eventually there was a few devs with write access and helping to manage the project and it ended up being very successful. I think if you can find people to help manage your project and allow yourself to trust other devs with that task, it will massively help your chances of not stalling the project.

I think the key to keeping a project’s momentum is to get really good at setting up the fundamentals for establishing a community:

  • Make it as easy as possible to contribute and discuss
  • Respond to your community in a timely fashion – doesn’t need to be a solution, but some form of acknowledgement is needed
  • Have good documentation and make sure the community can contribute to it
  • Have small achievable tasks on your tracker and use tags like “up-for-grabs” or “help-needed” so it’s easy for the community to know where they can ship in
  • Have CI/CD setup with tests, feedback and build outputs for the community to use
  • Trust other people in helping you to manage your project

How do larger OSS projects do it?

I can’t answer this question for all larger OSS projects, but I can provide some insight with what we do at Umbraco. The more popular a project becomes, the more people there will be that that need help. Ideally, you’ll want to try to convert the people that are needing help, into people that are providing help. To do that you should have all of the above points working well to make it easy for your community to start helping each other instead of just relying on you. Trusting the community is certainly at the heart of it all and this allows for the community to manage several aspects of itself.

At Umbraco, we have a community PR team that dedicates their own time to helping out with the project and assisting with communication between the community and dev team and ensuring that contributors are receiving a timely response. We have a community documentation team that dedicates their own time to generate missing documentation, assessing documentation PRs and to help encourage more contributors to get involved. Our community forum is also open source and is where community members can ask and answer questions. We use GitHub for all of our code and our public issue tracker and use tags like up-for-grabs along with some bots to help automate the interaction with contributors on GitHub. We’ve also established some policies regarding issues and PRs to try to keep their numbers to a minimum, as one example: only allowing an up-for-grabs issue to be open for a certain amount of time and if it doesn’t get picked up it just gets closed. The premise for this is that it isn’t important enough for the community at the moment since nobody wanted to pick it up, so it gets closed with the option of being reopened if it becomes important again.

In order to manage all of this interaction we have a couple of full-time staff members that spend a significant amount of time working with the community and these community teams, on our forums and on our issue trackers. Several years ago, this was not the case and it’s now clear that managing a large community is a full time role and what quickly became obvious was that the more you invest in the community the more you get back.

CodeGarden conference

Are my own projects successful?

Sort of, yes and no. Some projects get old and I’d rather they didn’t exist anymore but people still use them so they need to be maintained. Some projects are newer and I’m excited about them but then lack the time to keep their momentum going. Then I have a problem of having too many projects! The important thing to me is that I keep learning and I’m generally happy to keep investing the time I can find into all of my projects. I think some of my projects would be more successful if I actually did all of the things I mentioned above :)

The fact is, unless you have a lot of spare time or you are getting paid to work on OSS (so that you can make time), establishing and fostering an active community is difficult and requires putting in a lot of time and effort. For me it’s entirely worth it, I think starting and managing your own OSS project is hugely rewarding and it’s a wonderful platform for learning and collaborating regardless of how big or small the project becomes.

Being a part of a community

You don’t need to be the founder of a project to reap the rewards of OSS. You can learn an enormous amount by collaborating on an OSS project. Of course there’s plenty of technical knowledge to gain but there’s a lot of other skills you can gain too and in my opinion the most important of all is communication skills. It’s easy to get frustrated by software or by other community members especially if you’ve run into some annoying bugs, somebody is being a jerk or just being difficult to communicate with. But, it’s important to not let these types of things get the better of you and that in itself is a difficult skill to master!

Communication is a 2 way street and it’s important for both community members and project owners to be friendly, patient and helpful.

A great example of this is in bug reports. Some reports are unhelpful, aggressive or even angry. When submitting bug reports or asking questions, keep in mind that you are generally asking people for help for free. Please be helpful, please be friendly, please be patient. Please think about how you would like to receive a bug report or be asked a question, include as much information as you can and remember that most people can’t read minds ;) And vice-versa, if you are responding to questions where people aren’t being as helpful as they should be, you’ll typically you’ll be able to turn a conversation into a friendly, patient and helpful one by just communicating that way yourself.

English is typically the language used in OSS projects and some people might not speak English as a first language and that’s ok! In this case, those 3 points are extremely important and it’s quite rewarding to see international community members who come from all sorts of backgrounds, countries and languages collaborating on a single project.

When both community members and project owners adopt these values, great things will happen and everyone wins!

Umbraco Friendly Hoodie


… now I need to go find some time to update my OSS projects :)

This blog is powered by Articulate, an OSS project that I maintain which is running on Umbraco, an OSS project that I work for and this post was written using Open Live Writer, an OSS project that could use some love.

How I upgraded my site to Umbraco 8 on Umbraco Cloud

$
0
0

I have a Development site and a Live site on Umbraco Cloud. You might have some additional environments but in theory these steps should be more or less the same. This is just a guide that hopefully helps you, it’s by no means a fail-safe step by step guide, you’ll probably run into some other issues and edge cases that I didn’t.  You will also need access to Kudu since you will most likely need to delete some left over files manually, you will probably also need to toggle debug and custom errors settings in your web.config to debug any YSODs you get along the way, you will need to manually change the Umbraco version number in the web.config during the upgrade process and you might need access to the Live Git repository endpoint in case you need to rollback.

… Good luck!

Make sure you can upgrade

Make sure you have no Obsolete data types

You cannot upgrade to v8 if you have any data types referencing old obsolete property editors. You will first need to migrate any properties using these to the non-obsolete version of these property editors. You should do this on your Dev (or lowest environment): Go to each data type and check if the property editor listed there is prefixed with the term “Obsolete”. If it is you will need to change this to a non-obsolete property editor. In some cases this might be tricky, for others it might be an easy switch. For example, I’m pretty sure you can switch from the Obsolete Content Picker to the normal Content Picker. Luckily for me I didn’t have any data relying on these old editors so I could just delete these data types.

Make sure you aren’t using incompatible packages

If you are using packages, make sure that any packages you are using also have a working v8 version of that package.

Make sure you aren’t using legacy technology

If you are using XSLT, master pages, user controls or other weird webforms things, you are going to need to migrate all of that to MVC before you can continue since Umbraco 8 doesn’t support any of these things.

Ensure all sites are in sync

Very important that all Cloud environments are in sync with all of your latest code and there’s no outstanding code that needs to be shipped between them. Then you need to make sure that all content and media are the same across your environments since each one will eventually be upgraded independently and you want to use your Dev site for testing along with pulling content/media to your local machine.

Clone locally, sync & backup

Once all of your cloud sites are in sync, you’ll need to clone locally – I would advise to start with a fresh clone. Then restore all of your content and media and ensure your site runs locally on your computer. Once that’s all running and your site is basically running and operating like your live site you’ll want to take a backup. This is just for piece of mind, when upgrading your actual live site you aren’t going to lose any data. To do this, close VS Code (or whatever tool you use to run your local site) and navigate to ~/App_Data/ and you’ll see Umbraco.mdf and Umbraco_log.mdf files. Make copies of those and put them someplace. Also make a zip of your ~/media folder.

Now to make things easy in case you need to start again, make a copy of this entire site folder which you can use for the work in progress/upgrade/migration. If you ever need to start again, you can just delete this copied wip folder and re-copy the original.

Create/clone a new v8 Cloud site

This can be a trial site, it’s just a site purely to be able to clone so we can copy some files over from it. Once you’ve cloned locally feel free to delete that project.

Update local site files

Many people will be using a visual studio web application solution with Nuget, etc… In fact I am too but for this migration it turned out to be simpler in my case to just upgrade/migrate the cloned website.

Next, I deleted all of the old files:

  • The entire /bin directly – we’ll put this back together with only the required parts, we can’t have any old left over DLLs hanging around
  • /Config
  • /App_Plugins/UmbracoForms, /App_Plugins/Deploy, /App_Plugins/DiploTraceLogViewer
  • /Umbraco& /Umbraco_Client
  • Old tech folders - /Xslt, /Masterpages, /UserControls, /App_Browsers
  • /web.config

If you use App_Code, then for now rename this to something else. You will probably have to refactor some of the code in there to work and for now the goal is to just get the site up and running and the database upgraded. So rename to _App_Code or whatever you like so long as it’s different.

Copy over the files from the cloned v8 sites:

  • /bin
  • /Config
  • /App_Plugins/UmbracoForms, /App_Plugins/Deploy
  • /Umbraco
  • /Views/Partials/Grid, /Views/MacroPartials, /Views/Partials/Forms– overwrite existing files, these are updated Forms and Umbraco files
  • /web.config

Merge any custom config

Create a git commit before continuing.

Now there’s some manual updates involved. You may have had some custom configuration in some of the /Config/* files and in your /web.config file. So it’s time to have a look in your git history. That last commit you just made will show all of the changes overwritten in any /config files and your web.config file so now you can copy any changes you want to maintain back to these files. Things like custom appSettings, etc…

One very important setting is the Umbraco.Core.ConfigurationStatus appSetting, you must change this to your previous v7 version so the upgrader knows it needs to upgrade and from where.

Upgrade the database

Create a git commit before continuing.

At this stage, you have all of the Umbraco files, config files and binary files needed to run Umbraco v8 based on the version that was provided to your from your cloned Cloud site. So go ahead and try to run the website, with any luck it will run and you will be prompted to login and upgrade. If not and you have some YSODs or something, then the only advise I can offer at this stage is to debug the error.

Now run the upgrader – this might also require a bit of luck and depends on what data is in your site, if you have some obscure property editors or if your site is super old and has some strange database configurations. My site is super old, from v4 and over the many years I’ve managed to wrangle it through the version upgrades and it also worked on v8 (after a few v8 patch releases were out to deal with old schema issues). If this doesn’t work, you may be prompted with a detailed error specifically telling you way (i.e. you have obsolete property editors installed), or it might just fail due to old schema problems. For the latter problem, perhaps some of these tickets might help you resolve it.

When you get this to work, it’s a good time to make a backup of your local DB. Close down the running website and tool you used to launch it, then make a backup of the Umbraco.mdf and Umbraco_log.mdf files.

Fix your own code

You will probably have noticed that the site now runs, you can probably access the back office (maybe?!) but your site probably has YSODs. This is most likely because:

  • Your views and c# code needs to be updated to work with the v8 APIs (remember to rename your _App_Code folder back to App_Code if you use it!)
  • Your packages need to be re-installed or upgraded or migrated into your new website with compatible v8 versions

This part of the migration process is going to be different for everyone. Basic sites will generally be pretty simple but if you are using lots of packages or custom code or a visual studio web application and/or additional class libraries, then there’s some manual work involved on your part. My recommendation is that each time you fix part of your sites you create a Git commit. You can always revert to previous commits if you want and you also have a backup of your v8 database if you ever need to revert that too. The API changes from v7 –> v8 aren’t too huge, you’ll have your local site up and running in no time!

Rebuild your deploy files

Create a git commit before continuing.

Now that your site is working locally in v8, it’s time to prep everything to be sent to Umbraco Cloud.

Since you are now running a newer version of Umbraco deploy you’ll want to re-generate all of the deploy files. You can do this by starting up your local site again, then open the command prompt and navigate to /data folder of your website. Then type in :

echo > deploy-export

All of your schema items will be re-exported to new deploy files.

Create a git commit before continuing.

Push to Dev

In theory if your site is working locally then there’s no reason why it won’t work on your Dev site once you push it up to Cloud. Don’t worry though, if all else fails, you can always revert back to a working commit for your site.

So… go ahead and push!

Once that is done, the status bar on the Cloud portal will probably be stuck at the end stage saying it’s trying to process Deploy files… but it will just hang there because it’s not able to. This is because your site is now in Upgrade mode since we’ve manually upgraded.

At this stage, you are going to need to login to Kudu. Go to the cmd prompt and navigate to /site/wwwroot/web.config and edit this file. The Umbraco.Core.ConfigurationStatus is going to be v8 already because that is what you committed to git and pushed to Cloud but we need Umbraco to detect an upgrade is required, so change this value to the v7 version you originally had (this is important!). While you are here, ensure that debug = false and CustomErrors = Off so you can see any errors that might occur.

Now visit the root of the site, you should be redirected to the login screen and then to the upgrade screen. With some more luck, this will ‘just work’!

Because the Deploy files couldn’t be processed when you first pushed because the site was in upgrade mode, you need to re-force the deploy files to be processed so go back to kudu cmd prompt and navigate to /site/wwwroot/data and type in:

echo > deploy

Test

Make sure your dev site is working as you would expect it to. There’s a chance you might have missed some code that needs changing in your views or other code. If that is the case, make sure you fix it first on your local site, test there and then push back up to Dev and then test again there. Don’t push to a higher environment until you are ready.

Push to Live

You might have other environments between Dev and Live so you need to follow the same steps as pushing to Dev (i.e. once you push you will need to go to Kudu, change the web.config version, debug and custom error mode). Pushing to Live is the same approach but of course your live site is going to incur some downtime. If you’ve practiced with a Staging site, you’ll know how much downtime to expect, in theory it could be as low as a couple minutes but of course if something goes wrong it could be for longer.

… And Hooray! You are live on v8 :)

Before you go, there’s a few things you’ll want to do:

  • log back into kudu on your live site and in your web.config turn off debug and change custom errors back to RemoteOnly
  • be sure to run “echo > deploy”
  • in kudu delete the temp file folder: App_Data/Temp
  • Rebuild your indexes via the back office dashboard
  • Rebuild your published caches via the back office dashboard

What if something goes wrong?

I mentioned above that you can revert to a working copy, but how? Well this happened to me since I don’t follow my own instructions and I forgot to get rid of the data types with Obsolete property editors on live which means all of my environments were not totally synced before I started since I had fixed that on Dev. When I pushed to live and then ran the upgrader, it told me that I had data types with old Obsolete property editors … well in that scenario there’s nothing I could do about it since I can’t login to the back office and change anything. So I had to revert the Live site to the commit before the merge from Dev –> Live. Luckily all database changes with the Upgrader are done in a transaction so your live data isn’t going to be changed unless the upgrader successfully completes.

To rollback, I logged into Kudu and on the home page there is a link to “Source control info” where you can get the git endpoint for your Live environment. Then I cloned that all down locally and reverted the merge, committed and pushed back up to the live site. Now the live site was just back to it’s previous v7 state and I could make the necessary changes. Once that was done, I reverted my revert commit locally and pushed back to Live, and went through the upgrade process again.

Next steps?

Now your site is live on v8 but there’s probably more to do for you solution. If you are like me, you will have a Visual Studio solution with a web application to power your website. I then run this locally and publish to my local file system – which just happens to be the location of my cloned git repo for my Umbraco Cloud Dev site, then I push those changes to Cloud. So now I needed to get my VS web application to produce the same binary output as Cloud. That took a little bit to figure out since Umbraco Cloud includes some extra DLLs/packages that are not included in the vanilla Umbraco Cms package, namely this one: “Serilog.Sinks.MSSqlServer - Version 5.1.3-dev-00232” so you’ll probably need to include that as a package reference to your site too.

That’s about as far as I’ve got myself, best of luck!
Web Application projects with Umbraco Cloud

$
0
0

This is a common topic for developers when working with Umbraco Cloud because Umbraco Cloud simply hosts an ASP.Net Framework “Website”. The setup is quite simple, a website is stored in a Git repository and when it’s updated and pushed to Umbraco Cloud, all of the changes are live. You can think of this Git repository as a deployment repository (which is very similar to how Azure Web Apps can work with git deployments). When you create a new Umbraco Cloud site, the git repository will be pre-populated with a runnable website. You can clone the website and run it locally with IIS Express and it all just works. But this is not a compile-able website and it’s not part of a visual studio project or a solution and if you want to have that, there’s numerous work arounds that people have tried and use but in my personal opinion they aren’t the ideal working setup that I would like.

Ideal solution

In my opinion the ideal solution for building web apps in .NET Framework is:

  • A visual studio solution
    • A compile-able Web Application project (.csproj)
    • Additional class library projects (as needed)
    • Unit/Integration test projects (as needed)
    • All dependencies are managed via Nuget
  • Git source control for my code, probably stored in GitHub
  • A build server, CI/CD, I like Azure Pipelines

I think this is a pretty standard setup for building websites but trying to wrangle this setup to work with Umbraco Cloud isn’t as easy as you’d think. A wonderful Umbraco community member Paul Sterling has written about how to do this a couple of times, here and here and there’s certainly a few hoops you’d need to jump through. These posts were also written before the age of Azure YAML Pipelines which luckily has made this process a whole lot easier

Solution setup

NOTE: This is for Umbraco v8, there’s probably some other edge cases you’ll need to discover on your own for v7. 

Setting up a Visual Studio solution with a web application compatible for Umbraco Cloud is pretty straight forward and should be very familiar. It will be much easier to do this starting from scratch with a new Umbraco Cloud website though it is more than possible to do this for an existing website (i.e. I did this for this website!) but most of those details are just migrating custom code, assets, etc… to your new solution.

I would suggest starting with a new Umbraco Cloud site that has no modifications to it but does have a content item or two that renders a template.

  • Create a new VS solution/project for a web application running .NET 4.7.2
  • Add this Nuget.config to the root folder (beside your .sln file)
    • <?xml version="1.0" encoding="utf-8"?><configuration><packageSources><add key="NuGet" value="https://api.nuget.org/v3/index.json" /><add key="UmbracoCloud" value="https://www.myget.org/F/uaas/api/v3/index.json" /></packageSources></configuration>
  • Install the Nuget package for the same Umbraco version that you are currently running on your Umbraco Cloud website. For example if you are running 8.4.0 then use Install-Package UmbracoCms –Version 8.4.0
  • Install Forms (generally the latest available): Install-Package UmbracoForms
  • Install Deploy (generally the latest available):
    • Install-Package UmbracoDeploy
    • Install-Package UmbracoDeploy.Forms
    • Install-Package UmbracoDeploy.Contrib
  • Then you’ll need to install some additional Nuget packages that are required to run your site on Umbraco Cloud. This is undocumented but Umbraco Cloud adds a couple extra DLLs when it creates a website that are required.
    • Install-Package Serilog.Sinks.MSSqlServer -Version 5.1.3-dev-00232
  • Copy these files from your Umbraco Cloud deployment repository to your web application project:
    • ~/data/*
    • ~/config/UmbracoDeploy.config
    • ~/config/UmbracoDeploy.Settings.config
  • You then need to do something weird. These settings need to be filled in because Umbraco Deploy basically circumvents the normal Umbraco installation procedure and if you don’t have these settings populated you will get YSODs and things won’t work.
    • Make sure that you have your Umbraco version specified in your web.config like: <add key="Umbraco.Core.ConfigurationStatus" value="YOURVERSIONGOESHERE" />
    • Make sure your connectionStrings in your web.config is this:
      • <connectionStrings><remove name="umbracoDbDSN" /><add name="umbracoDbDSN"
                 connectionString="Data Source=|DataDirectory|\Umbraco.sdf"
                 providerName="System.Data.SqlServerCe.4.0" /></connectionStrings>

But I don’t want to use SqlCE! Why do I need that connection string? In actual fact Umbraco Deploy will configure your web application to use Sql Express LocalDb if it’s available on your machine (which it most likely is). This is why when running Umbraco Cloud sites locally you’ll see .mdf and .ldf files in your App_Data folder instead of SqlCE files. Local Db operates just like Sql Server except the files are located locally, it’s really sql server under the hood. You can even use Sql Management Studio to look at these databases by connecting to the (localdb)\umbraco server locally with Windows Authentication. It is possible to have your local site run off of a normal Sql server database with a real connection string but I think you’d have to install Umbraco first before you install the UmbracoDeploy nuget package. Ideally UmbracoDeploy would allow the normal install screen to run if there was no Umbraco version detected in the web.config, but that’s a whole other story.

That should be it! In theory your web application is now configured to be able to publish a website output that is the same as what is on Umbraco Cloud.

Installation

At this stage you should be able to run your solution, it will show the typical Umbraco Deploy screen to restore from Cloud

image

In theory you should be able to restore your website and everything should ‘just work’

Working with code

Working with your code is now just the way you’re probably used to working. Now that you’ve got a proper Visual Studio solution with a Web Application Project, you can do all of the development that you are used to. You can add class libraries, unit test projects, etc… Then you commit all of these changes to your own source control like GitHub. This type of repository is not a deployment repository, this is a source code repository.

How do I get this to Umbraco Cloud?

So far there’s nothing too special going on but now we need to figure out how to get our Web Application Project to be deployed to Umbraco Cloud.

There’s a couple ways to do this, the first way is surprisingly simple:

  • Right click your web application project in VS
  • Click Publish
  • Choose Folder as a publish target
  • Select your cloned Umbraco Cloud project location
  • Click advanced and choose “Exclude files from App_Data folder’
  • Click Create Profile
  • Click Publish – you’ve just published a web application project to a website
  • Push these changes to Umbraco Cloud

The publish profile result created should match this one: https://github.com/umbraco/vsts-uaas-deploy-task/blob/master/PublishProfiles/ToFileSys.pubxml

This of course requires some manual work but if you’re ok with that then job done!

You should do this anyways before continuing since it will give you an idea of how in-sync your web application project and the output website is to the Umbraco Cloud website, you can then see what Git changes have been made and troubleshoot anything that might seem odd.

Azure Pipelines

I’m all for automation so instead I want Azure Pipelines to do my work. This is what I want to happen:

  • Whenever I commit to my source code repo Azure Pipelines will:
    • Build my solution
    • Run any unit tests that I have
    • Publish my web application project to a website
    • Zip the website
    • Publish my zipped website artifact
  • When I add a “release-*” tag to a commit I want Azure Pipelines to do all of the above and also:
    • Clone my Umbraco Cloud repository
    • Unzip my website artifact onto this cloned destination
    • Commit these changes to the Umbraco Cloud deployment repository
    • Push this commit to Umbraco Cloud

Luckily this work is all done for you :) and with YAML pipelines it’s fairly straight forward. Here’s how:

  • Go copy this PowerShell file and commit it to the /build folder of your source code repository (our friends Paul Sterling and Morten Christensen had previously done this work, thanks guys!). This PS script essentially does all of that Git work mentioned above, the cloning, committing and pushing files. It’s a bit more verbose than just running these git comands directly in your YAML file but it’s also a lot less error prone and handles character encoding properly along with piping the output of the git command to the log.
  • Go copy this azure-pipelines.yml file and commit it to the root of your git source code repository. This file contains a bunch of helpful notes so you know what it’s doing. (This pipelines file does run any tests, etc… that exercise will be left up to you.)
  • In Azure Pipelines, create a new pipeline, choose your Git source control option, choose “Existing Azure Pipelines YAML file”, select azure-pipelines.yml file in the drop down, click continue.
  • Click Variables and add these 3:
    • gitAddress = The full Git https endpoint for your Dev environment on Umbraco Cloud
    • gitUsername = Your Umbraco Cloud email address
    • gitPassword = Your Umbraco Cloud password - ensure this value is set to Secret
  • Click Run!

And that’s it! … Really? … In theory yes :)

Your pipeline should run and build your solution. The latest commit you made is probably the azure-pipelines.yml files so it didn’t contain a release-* tag so it’s not going to attempt to push any changes to Umbraco Cloud. So first thing to do is make sure that your your pipeline is building your solution and doing what its supposed to. Once that’s all good then it’s time to test an Umbraco Cloud deployment.

Deploying to Umbraco Cloud

A quick and easy test would be to change the output of a template so you can visibly see the change pushed.

  • Go ahead and make a change to your home page template
  • Run your site locally with your web application project and make sure the change is visible there
  • Commit this change to your source control Git repository
  • Create and push a release tag on this commit. For example, the tag name could be: “release-v1.0.0-beta01” … whatever suites your needs but based on the YAML script it needs to start with “release-“

Now you can sit back and watch Azure Pipelines build your solution and push it to Umbraco Cloud. Since this is a multi-stage pipeline, the result will look like:

image

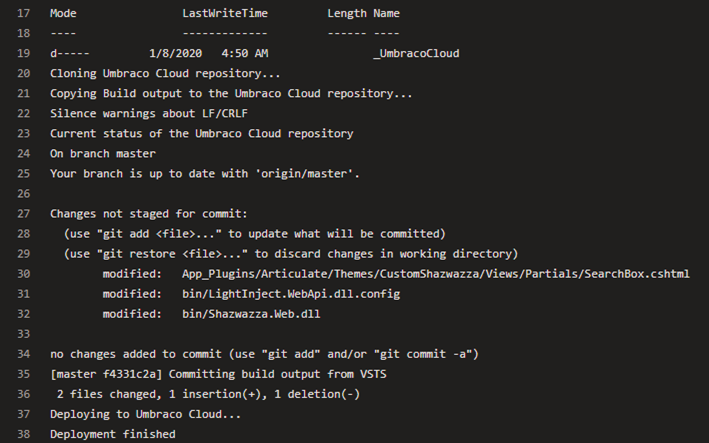
And you should see a log output like this on the Deploy stage

image

Whoohoo! Automated deployments to Umbraco Cloud using Web Application Projects.

What about auto-upgrades?

All we’ve talked about so far is a one-way push to Umbraco Cloud but one thing we know and love about Umbraco Cloud is the automated upgrade process. So how do we deal with that? I actually have this working on my site but want to make the process even simpler so you’re going to have to be patient and wait for another blog post :)

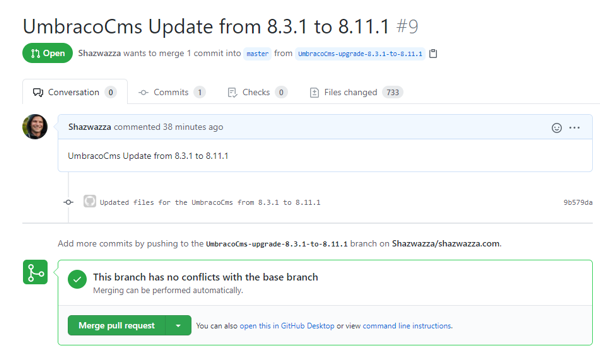
The way it works is also using Azure Pipelines. Using a separate pipeline with a custom Git repo pointed at your Umbraco Cloud repository, this pipeline can be configured to poll for changes every day (or more often if you like). It then checks if changes have been made to the packages.config file to see if there’s been upgrades made to either the CMS, Forms or Deploy (in another solution I’m actually polling Nuget directly for this information). If an upgrade has been made, It clones down your source code repository, runs a Nuget update command to upgrade your solution. Then it creates a new branch, commits these changes, pushes it back GitHub and creates a Pull Request (currently this only works for GitHub).

This same solution can be used for Deploy files in case administrators are changing schema items directly on Umbraco Cloud so the /deploy/* files can be automatically kept in sync with your source code repository.

This idea is entirely inspired by Morten Christensen, thanks Morten! Hopefully I’ll find some time to finalize this.

Stay tuned!

Examine and Azure Blob Storage

$
0
0

Quite some time ago - probably close to 2 years - I created an alpha version of an extension library to Examine to allow storing Lucene indexes in Blob Storage called Examine.AzureDirectory. This idea isn’t new at all and in fact there’s been a library to do this for many years called AzureDirectory but it previously had issues and it wasn’t clear on exactly what it’s limitations are. The Examine.AzureDirectory implementation was built using a lot of the original code of AzureDirectory but has a bunch of fixes (which I contributed back to the project) and different ways of working with the data. Also since Examine 0.1.90 still worked with lucene 2.x, this also made this compatible with the older Lucene version.

… And 2 years later, I’ve actually released a real version 🎉

Why is this needed?

There’s a couple reasons – firstly Azure web apps storage run on a network share and Lucene absolutely does not like it’s files hosted on a network share, this will bring all sorts of strange performance issues among other things. The way AzureDirectory works is to store the ‘master’ index in Blob Storage and then sync the required Lucene files to the local ‘fast drive’. In Azure web apps there’s 2x drives: ‘slow drive’ (the network share) and the ‘fast drive’ which is the local server’s temp files on local storage with limited space. By syncing the Lucene files to the local fast drive it means that Lucene is no longer operating over a network share. When writes occur, it writes back to the local fast drive and then pushes those changes back to the master index in Blob Storage. This isn’t the only way to overcome this limitation of Lucene, in fact Examine has shipped a work around for many years which uses something called SyncDirectory which does more or less the same thing but instead of storing the master index in Blob Storage, the master index is just stored on the ‘slow drive’.  Someone has actually taken this code and made a separate standalone project with this logic called SyncDirectory which is pretty cool!

Load balancing/Scaling

There’s a couple of ways to work around the network share storage in Azure web apps (as above), but in my opinion the main reason why this is important is for load balancing and being able to scale out. Since Lucene doesn’t work well over a network share, it means that Lucene files must exist local to the process it’s running in. That means that when you are load balancing or scaling out, each server that is handling requests will have it’s own local Lucene index. So what happens when you scale out further and another new worker goes online? This really depending on the hosting application… for example in Umbraco, this would mean that the new worker will create it’s own local indexes by rebuilding the indexes from the source data (i.e. database). This isn’t an ideal scenario especially in Umbraco v7 where requests won’t be served until the index is built and ready. A better scenario is that the new worker comes online and then syncs an existing index from master storage that is shared between all workers …. yes! like Blob Storage.

Read/Write vs Read only

Lucene can’t be written to concurrently by multiple processes. There are some workarounds here a there to try to achieve this by synchronizing processes with named mutex/semaphore locks and even AzureSearch tries to handle some of this by utilizing Blob Storage leases but it’s not a seamless experience. This is one of the reasons why Umbraco requires a ‘master’ web app for writing and a separate web app for scaling which guarantees that only one process writes to the indexes. This is the setup that Examine.AzureDirectory supports too and on the front-end/replica/slave web app that scales you will configure the provider to be readonly which guarantees it will never try to write back to the (probably locked) Blob Storage.

With this in place, when a new front-end worker goes online it doesn’t need to rebuild it’s own local indexes, it will just check if indexes exist and to do that will make sure the master index is there and then continue booting. At this stage there’s actually almost no performance overhead. Nothing actually happens with the local indexes until the index is referenced by this worker and when that happens Examine will lazily just sync the Lucene files that it needs locally.

How do I get it?

First thing to point out is that this first release is only for Examine 0.1.90 which is for Umbraco v7. Support for Examine 1.x and Umbraco 8.x will come out very soon with some slightly different install instructions.

The release notes of this are here, the install docs are here, and the Nuget package for this can be found here.

PM> Install-Package Examine.AzureDirectory -Version 0.1.90

To activate it, you need to add these settings to your web.config

<add key="examine:AzureStorageConnString" value="YOUR-STORAGE-CONNECTION-STRING" /><add key="examine:AzureStorageContainer" value="YOUR-CONTAINER-NAME" />

Then for your master server/web app you’ll want to add a directoryFactory attribute to each of your indexers in ExamineSettings.config, for example:

<add name="InternalIndexer" type="UmbracoExamine.UmbracoContentIndexer, UmbracoExamine"
      supportUnpublished="true"
      supportProtected="true"
      directoryFactory="Examine.AzureDirectory.AzureDirectoryFactory, Examine.AzureDirectory"
      analyzer="Lucene.Net.Analysis.WhitespaceAnalyzer, Lucene.Net"/>

For your front-end/replicate/slave server you’ll want a different readonly value for the directoryFactory like:

<add name="InternalIndexer" type="UmbracoExamine.UmbracoContentIndexer, UmbracoExamine"
      supportUnpublished="true"
      supportProtected="true"
      directoryFactory="Examine.AzureDirectory.ReadOnlyAzureDirectoryFactory, Examine.AzureDirectory"
      analyzer="Lucene.Net.Analysis.WhitespaceAnalyzer, Lucene.Net"/>

Does it work?

Great question :) With the testing that I’ve done it works and I’ve had this running on this site for all of last year without issue but I haven’t rigorously tested this at scale with high traffic sites, etc… I’ve decided to release a real version of this because having this as an alpha/proof of concept means that nobody will test or use it. So now hopefully a few of you will give this a whirl and let everyone know how it goes. Any bugs can be submitted to the Examine repo.


Controller Scoped Model Binding in ASP.NET Core

$
0
0

Want to avoid [FromBody] attributes everywhere? Don’t want to use [ApiController] strict conventions? Don’t want to apply IInputFormatter’s globally?

ASP.NET Core MVC is super flexible but it very much caters towards configuring everything at a global level. Perhaps you are building a framework or library or a CMS in .NET Core? In which case you generally want to be as unobtrusive as possible so mucking around with global MVC configuration isn’t really acceptable. The traditional way of dealing with this is by applying configuration directly to controllers which generally means using controller base classes and attributes. This isn’t super pretty but it works in almost all cases from applying authorization/resource/action/exception/result filters to api conventions. However this doesn’t work for model binding.

Model binding vs formatters

Model binding comes in 2 flavors: formatters for deserializing the request body (like JSON) into models  and value providers for getting data from other places like form body, query string, headers, etc… Both of these things internally in MVC use model binders though typically the language used for binding the request body are called formatters. The problem with formatters (which are of type IInputFormatter) is that they are only applied at the global level as part of MvcOptions which are in turn passed along to a special model binder called BodyModelBinder. Working with IInputFormatter at the controller level is almost impossible.

There seems to be a couple options that look like you might be able to apply a custom IInputFormatter to a specific controller:

  • Create a custom IModelBinderProvider– this unfortunately will not work because the ModelBinderProviderContext doesn’t provide the ControllerActionDescriptor executing so you cannot apply this provider to certain controllers/actions (though this should be possible).
  • Assign a custom IModelBinderFactory to the controller explicitly by assigning ControllerBase.ModelBinderFactory in the controllers constructor – this unfortunately doesn’t work because the ControllerBase.ModelBinderFactory isn’t used for body model binding

So how does [ApiController] attribute work?

The [ApiController] attribute does quite a lot of things and configures your controller in a very opinionated way. It almost does what I want and it somehow magically does this

[FromBody] is inferred for complex type parameters

That’s great! It’s what I want to do but I don’t want to use the [ApiController] attribute since it applies too many conventions and the only way to toggle these …. is again at the global level :/ This also still doesn’t solve the problem of applying a specific IInputFormatter to be used for the model binding but it’s a step in the right direction.

The way that the [ApiController] attribute works is by using MVC’s “application model” which is done by implementing IApplicationModelProvider.

A custom IApplicationModelProvider

Taking some inspiration from the way [ApiController] attribute works we can have a look at the source of the application model that makes this happen: ApiBehaviorApplicationModelProvider. This basically assigns a bunch of IActionModelConvention’s: ApiVisibilityConvention, ClientErrorResultFilterConvention, InvalidModelStateFilterConvention, ConsumesConstraintForFormFileParameterConvention, ApiConventionApplicationModelConvention, and InferParameterBindingInfoConvention. The last one InferParameterBindingInfoConvention is the important one that magically makes complex type parameters bind from the request body like JSON like good old WebApi used to do.

So we can make our own application model to target our own controllers and use a custom IActionModelConvention to apply a custom body model binder:


public class MyApplicationModelProvider : IApplicationModelProvider
{
    public MyApplicationModelProvider(IModelMetadataProvider modelMetadataProvider)
    {
        ActionModelConventions = new List<IActionModelConvention>()
        {
            // Ensure complex models are bound from request body
            new InferParameterBindingInfoConvention(modelMetadataProvider),
            // Apply custom IInputFormatter to the request body
            new MyModelBinderConvention()
        };
    }

    public List<IActionModelConvention> ActionModelConventions { get; }

    public int Order => 0;

    public void OnProvidersExecuted(ApplicationModelProviderContext context)
    {
    }

    public void OnProvidersExecuting(ApplicationModelProviderContext context)
    {
        foreach (var controller in context.Result.Controllers)
        {
            // apply conventions to all actions if attributed with [MyController]
            if (IsMyController(controller))
                foreach (var action in controller.Actions)
                    foreach (var convention in ActionModelConventions)
                        convention.Apply(action);
        }
    }

    // returns true if the controller is attributed with [MyController]
    private bool IsMyController(ControllerModel controller)
        => controller.Attributes.OfType<MyControllerAttribute>().Any();
}

And the custom convention:


public class MyModelBinderConvention : IActionModelConvention
{
    public void Apply(ActionModel action)
    {
        foreach (var p in action.Parameters
            // the InferParameterBindingInfoConvention must execute first,
            // which assigns this BindingSource, so if that is assigned
            // we can then assign a custom BinderType to be used.
            .Where(p => p.BindingInfo?.BindingSource == BindingSource.Body))
        {
            p.BindingInfo.BinderType = typeof(MyModelBinder);
        }
    }
}

Based on the above application model conventions, any controller attributed with our custom [MyController] attribute will have these conventions applied to all of it’s actions. With the above, any complex model that will be bound from the request body will use the IModelBinder type: MyModelBinder, so here’s how that implementation could look:


// inherit from BodyModelBinder - it does a bunch of magic like caching
// that we don't want to miss out on
public class MyModelBinder : BodyModelBinder
{
    // TODO: You can inject other dependencies to pass to GetInputFormatter
    public MyModelBinder(IHttpRequestStreamReaderFactory readerFactory)
        : base(GetInputFormatter(), readerFactory)
    {
    }

    private static IInputFormatter[] GetInputFormatter()
    {  
        return new IInputFormatter[]
        {
            // TODO: Return any IInputFormatter you want
            new MyInputFormatter()
        };
    }
}

The last thing to do is wire it up in DI:


services.TryAddSingleton<MyModelBinder>();            
services.TryAddEnumerable(
    ServiceDescriptor.Transient<IApplicationModelProvider,
    MyApplicationModelProvider>());

That’s a reasonable amount of plumbing!

It could certainly be simpler to configure a body model binder at the controller level but at least there’s actually a way to do it. For a single controller this is quite a lot of work but for a lot of controllers the MVC “application mode” is quite brilliant! … it just took a lot of source code reading to figure that out :)

Writing a DocFx markdown plugin

$
0
0

What is DocFx? It’s a static site generator mainly used for creating API documentation for your code. But it can be used for any static sites. We use this for the Lucene.Net project’s website and documentation. The end result is API docs that look and feel a little bit familiar, kind of like Microsoft’s own API documentation website. I’m not entirely sure if their docs are built with DocFx but I suspect it is but with some highly customized builds and plugins … but that’s just my own assumption.

Speaking of customizing DocFx, it is certainly possible. That said the ironic part about DocFx is that it’s own documentation is not great. One of the markdown customizations we needed for the Lucene.Net project was to add a customized note that some APIs are experimental. This tag is based on the converted Java Lucene docs and looks like: “@ lucene.experimental”. So we wanted to detect that string and convert it to a nice looking note similar to the DocFx markdown note. Luckily there is some docs on how to do that although they’re not at all succinct but the example pretty much covers exactly what we wanted to do.

Block markdown token

This example is a block level token since it exists on it’s own line and not within other text. This is also the example DocFx provides in it’s docs. It’s relatively easy to do:

  • Register a IDfmEngineCustomizer to insert/add a “Block Rule”
  • Create a new “Block Rule” which in it’s simplistic form is a regex that parses the current text block and if it matches it returns an instance of a custom “Token” class
  • Create a custom “Token” class to store the information about what you’ve parsed
  • Create a custom “Renderer” to write out actual HTML result you want
  • Register a IDfmCustomizedRendererPartProvider to expose your “Renderer”

This all uses MEF to wire everything up. You can see the Lucene.Net implementation of a custom markdown block token here: https://github.com/apache/lucenenet/tree/master/src/docs/LuceneDocsPlugins

Inline markdown token

The above was ‘easy’ because it’s more or less following the DocFx documentation example. So the next challenge is that I wanted to be able to render an Environment Variable value within the markdown… sounds easy enough? Well the code result is actually super simple but my journey to get there was absolutely not!

There’s zero documentation about customizing the markdown engine for inline markdown and there’s almost zero documentation in the codebase about what is going on too which makes things a little interesting. I tried following the same steps above for the block markdown token and realized in the code that it’s using a MarkdownBlockContext instance so I discovered there’s a MarkdownInlineContext so thought, we’ll just swap that out … but that doesn’t work. I tried inserting my inline rule at the beginning, end, middle, etc… of the DfmEngineBuilder.InlineInlineRules within my IDfmEngineCustomizer but nothing seemed to happen. Hrm. So I cloned the DocFx repo and started diving into the tests and breaking pointing, etc…

So here’s what I discovered:

  • Depending on the token and if a token can contain other tokens, its the tokens responsibility to recurse the parsing
  • There’s a sort of ‘catch all’ rule called MarkdownTextInlineRule and that will ‘eat’ characters that don’t match the very specific markdown chars that it’s not looking for.
    • This means that if you have an inline token that is delimited by chars that this doesn’t ‘eat’, then your rule will not match. So your rule can only begin with certain chars: \<!\[*`
  • Your rule must run before this one
  • For inline rules you don’t need a “Renderer” (i.e. IDfmCustomizedRendererPartProvider)
  • Inline rule regex needs to match at the beginning of the string with the hat ^ symbol. This is a pretty critical part of how DocFx parses it’s inline content.

Now that I know that, making this extension is super simple:

  • I’ll make a Markdown token: [EnvVar:MyEnvironmentVar] which will parse to just render the value of the environment variable with that name, in this example: MyEnvironmentVariable.
  • I’ll insert my rule to the top of the list so it doesn’t come after the catch-all rule
// customize the engine
[Export(typeof(IDfmEngineCustomizer))]
public class LuceneDfmEngineCustomizer : IDfmEngineCustomizer
{
    public void Customize(DfmEngineBuilder builder, IReadOnlyDictionary<string, object> parameters)
        {
        // insert inline rule at the top
        builder.InlineRules = builder.InlineRules.Insert(0, new EnvironmentVariableInlineRule());
    }
}

// define the rule
public class EnvironmentVariableInlineRule : IMarkdownRule
{
    // give it a name
    public string Name => "EnvVarToken";

    // define my regex to match
    private static readonly Regex _envVarRegex = new Regex(@"^\[EnvVar:(\w+?)\]", RegexOptions.Compiled);

    // process the match
    public IMarkdownToken TryMatch(IMarkdownParser parser, IMarkdownParsingContext context)
    {
        var match = _envVarRegex.Match(context.CurrentMarkdown);
        if (match.Length == 0) return null;

        var envVar = match.Groups[1].Value;
        var text = Environment.GetEnvironmentVariable(envVar);
        if (text == null) return null;

        // 'eat' the characters of the current markdown token so they aren't re-processed
        var sourceInfo = context.Consume(match.Length);

        // return a docfx token that just returns the text passed to it
        return new MarkdownTextToken(this, parser.Context, text, sourceInfo);
    }
}

In the end, that’s actually pretty simple! But don’t go trying to create a fancy token that doesn’t start with those magic characters since it’s not going to work.


Filtering fields dynamically with Examine

$
0
0

The index fields created by Umbraco in Examine by default can lead to quite a substantial amount of fields. This is primarily due in part by how Umbraco handles variant/culture data because it will create a different field per culture but there are other factors as well. Umbraco will create a “__Raw_” field for each rich text field and if you use the grid, it will create different fields for each grid row type. There are good reasons for all of these fields and this allows you by default to have the most flexibility when querying and retrieving your data from the Examine indexes. But in some cases these default fields can be problematic. Examine by default uses Lucene as it’s indexing engine and Lucene itself doesn’t have any hard limits on field count (as far as I know), however if you swap the indexing engine in Examine to something else like Azure Search with ExamineX then you may find your indexes are exceeding Azure Search’s limits.

Azure Search field count limits

Azure Search has varying limits for field counts based on the tier service level you have (strangely the Free tier allows more fields than the Basic tier). The absolute maximum however is 1000 fields and although that might seem like quite a lot when you take into account all of the fields created by Umbraco you might realize it’s not that difficult to exceed this limit. As an example, lets say you have an Umbraco site using language variants and you have 20 languages in use. Then let’s say you have 15 document types each with 5 fields (all with unique aliases) and each field is variant and you have content for each of these document types and languages created. This immediately means you are exceeding the field count limits: 20 x 15 x 10 = 1500 fields! And that’s not including the “__Raw_” fields or the extra grid fields or the required system fields like “id” and “nodeName”. I’m unsure why Azure Search even has this restriction in place

Why is Umbraco creating a field per culture?

When v8 was being developed a choice had to be made about how to handle multi-lingual data in Examine/Lucene. There’s a couple factors to consider with making this decision which mostly boils down to how Lucene’s analyzers work. The choice is either: language per field or language per index. Some folks might think, can’t we ‘just’ have a language per document? Unfortunately the answer is no because that would require you to apply a specific language analyzer for that document and then scoring would no longer work between documents. Elastic Search has a good write up about this. So either language per field or different indexes per language. Each has pros/cons but Umbraco went with language per field since it’s quite easy to setup, supports different analyzers per language and doesn’t require a ton of indexes which also incurs a lot more overhead and configuration.

Do I need all of these fields?

That really depends on what you are searching on but the answer is most likely ‘no’. You probably aren’t going to be searching on over 1000s fields, but who knows every site’s requirements are different. Umbraco Examine has something called an IValueSetValidator which you can configure to include/exclude certain fields or document types. This is synonymous with part of the old XML configuration in Examine. This is one of those things where configuration can make sense for Examine and @callumwhyte has done exactly that with his package “Umbraco Examine Config”. But the IValueSetValidator isn’t all that flexible and works based on exact naming which will work great for filtering content types but perhaps not field names. (Side note – I’m unsure if the Umbraco Examine Config package will work alongside ExamineX, need to test that out).

Since Umbraco creates fields with the same prefixed names for all languages it’s relatively easy to filter the fields based on a matching prefix for the fields you want to keep.

Here’s some code!

The following code is relatively straight forward with inline comments: A custom class “IndexFieldFilter” that does the filtering and can be applied different for any index by name, a Component to apply the filtering, a Composer to register services. This code will also ensure that all Umbraco required fields are retained so anything that Umbraco is reliant upon will still work.

/// <summary>
/// Register services
/// </summary>
public class MyComposer : ComponentComposer<MyComponent>
{
    public override void Compose(Composition composition)
    {
        base.Compose(composition);
        composition.RegisterUnique<IndexFieldFilter>();
    }
}

public class MyComponent : IComponent
{
    private readonly IndexFieldFilter _indexFieldFilter;

    public MyComponent(IndexFieldFilter indexFieldFilter)
    {
        _indexFieldFilter = indexFieldFilter;
    }

    public void Initialize()
    {
        // Apply an index field filter to an index
        _indexFieldFilter.ApplyFilter(
            // Filter the external index 
            Umbraco.Core.Constants.UmbracoIndexes.ExternalIndexName, 
            // Ensure fields with this prefix are retained
            new[] { "description", "title" },
            // optional: only keep data for these content types, else keep all
            new[] { "home" });
    }

    public void Terminate() => _indexFieldFilter.Dispose();
}

/// <summary>
/// Used to filter out fields from an index
/// </summary>
public class IndexFieldFilter : IDisposable
{
    private readonly IExamineManager _examineManager;
    private readonly IUmbracoTreeSearcherFields _umbracoTreeSearcherFields;
    private ConcurrentDictionary<string, (string[] internalFields, string[] fieldPrefixes, string[] contentTypes)> _fieldNames
        = new ConcurrentDictionary<string, (string[], string[], string[])>();
    private bool disposedValue;

    /// <summary>
    /// Constructor
    /// </summary>
    /// <param name="examineManager"></param>
    /// <param name="umbracoTreeSearcherFields"></param>
    public IndexFieldFilter(
        IExamineManager examineManager,
        IUmbracoTreeSearcherFields umbracoTreeSearcherFields)
    {
        _examineManager = examineManager;
        _umbracoTreeSearcherFields = umbracoTreeSearcherFields;
    }

    /// <summary>
    /// Apply a filter to the specified index
    /// </summary>
    /// <param name="indexName"></param>
    /// <param name="includefieldNamePrefixes">
    /// Retain all fields prefixed with these names
    /// </param>
    public void ApplyFilter(
        string indexName,
        string[] includefieldNamePrefixes,
        string[] includeContentTypes = null)
    {
        if (_examineManager.TryGetIndex(indexName, out var e)&& e is BaseIndexProvider index)
        {
            // gather all internal index names used by Umbraco 
            // to ensure they are retained
            var internalFields = new[]
                {
                LuceneIndex.CategoryFieldName,
                LuceneIndex.ItemIdFieldName,
                LuceneIndex.ItemTypeFieldName,
                UmbracoExamineIndex.IconFieldName,
                UmbracoExamineIndex.IndexPathFieldName,
                UmbracoExamineIndex.NodeKeyFieldName,
                UmbracoExamineIndex.PublishedFieldName,
                UmbracoExamineIndex.UmbracoFileFieldName,
                "nodeName"
            }
                .Union(_umbracoTreeSearcherFields.GetBackOfficeFields())
                .Union(_umbracoTreeSearcherFields.GetBackOfficeDocumentFields())
                .Union(_umbracoTreeSearcherFields.GetBackOfficeMediaFields())
                .Union(_umbracoTreeSearcherFields.GetBackOfficeMembersFields())
                .ToArray();

            _fieldNames.TryAdd(indexName, (internalFields, includefieldNamePrefixes, includeContentTypes ?? Array.Empty<string>()));

            // Bind to the event to filter the fields
            index.TransformingIndexValues += TransformingIndexValues;
        }
        else
        {
            throw new InvalidOperationException(
                $"No index with name {indexName} found that is of type {typeof(BaseIndexProvider)}");
        }
    }

    private void TransformingIndexValues(object sender, IndexingItemEventArgs e)
    {
        if (_fieldNames.TryGetValue(e.Index.Name, out var fields))
        {
            // check if we should ignore this doc by content type
            if (fields.contentTypes.Length > 0 && !fields.contentTypes.Contains(e.ValueSet.ItemType))
            {
                e.Cancel = true;
            }
            else
            {
                // filter the fields
                e.ValueSet.Values.RemoveAll(x =>
                {
                    if (fields.internalFields.Contains(x.Key)) return false;
                    if (fields.fieldPrefixes.Any(f => x.Key.StartsWith(f))) return false;
                    return true;
                });
            }
        }
    }

    protected virtual void Dispose(bool disposing)
    {
        if (!disposedValue)
        {
            if (disposing)
            {
                // Unbind from the event for any bound indexes
                foreach (var keys in _fieldNames.Keys)
                {
                    if (_examineManager.TryGetIndex(keys, out var e)
                        && e is BaseIndexProvider index)
                    {
                        index.TransformingIndexValues -= TransformingIndexValues;
                    }
                }
            }
            disposedValue = true;
        }
    }

    public void Dispose()
    {
        Dispose(disposing: true);
        GC.SuppressFinalize(this);
    }
}

That should give you the tools you need to dynamically filter your index based on fields and content type’s if you need to get your field counts down. This would also be handy even if you aren’t using ExamineX and Azure Search since keeping an index size down and storing less data means less IO operations and storage size.

Searching with IPublishedContentQuery in Umbraco

$
0
0

I recently realized that I don’t think Umbraco’s APIs on IPublishedContentQuery are documented so hopefully this post may inspire some docs to be written or at least guide some folks on some functionality they may not know about.

A long while back even in Umbraco v7 UmbracoHelper was split into different components and UmbracoHelper just wrapped these. One of these components was called ITypedPublishedContentQuery and in v8 is now called IPublishedContentQuery, and this component is responsible for executing queries for content and media on the front-end in razor templates. In v8 a lot of methods were removed or obsoleted from UmbracoHelper so that it wasn’t one gigantic object and tries to steer developers to use these sub components directly instead. For example if you try to access UmbracoHelper.ContentQuery you’ll see that has been deprecated saying:

Inject and use an instance of IPublishedContentQuery in the constructor for using it in classes or get it from Current.PublishedContentQuery in views

and the UmbracoHelper.Search methods from v7 have been removed and now only exist on IPublishedContentQuery.

There are API docs for IPublishedContentQuery which are a bit helpful, at least will tell you what all available methods and parameters are. The main one’s I wanted to point out are the Search methods.

Strongly typed search responses

When you use Examine directly to search you will get an Examine ISearchResults object back which is more or less raw data. It’s possible to work with that data but most people want to work with some strongly typed data and at the very least in Umbraco with IPublishedContent. That is pretty much what IPublishedContentQuery.Search methods are solving. Each of these methods will return an IEnumerable<PublishedSearchResult> and each PublishedSearchResult contains an IPublishedContent instance along with a Score value. A quick example in razor:

@inherits Umbraco.Web.Mvc.UmbracoViewPage
@using Current = Umbraco.Web.Composing.Current;
@{
    var search = Current.PublishedContentQuery.Search(Request.QueryString["query"]);
}<div><h3>Search Results</h3><ul>
        @foreach (var result in search)
        {<li>
                Id: @result.Content.Id<br/>
                Name: @result.Content.Name<br />
                Score: @result.Score</li>
        }</ul></div>

The ordering of this search is by Score so the highest score is first. This makes searching very easy while the underlying mechanism is still Examine. The IPublishedContentQuery.Search methods make working with the results a bit nicer.

Paging results

You may have noticed that there’s a few overloads and optional parameters to these search methods too. 2 of the overloads support paging parameters and these take care of all of the quirks with Lucene paging for you. I wrote a previous post about paging with Examine and you need to make sure you do that correctly else you’ll end up iterating over possibly tons of search results which can have performance problems. To expand on the above example with paging is super easy:

@inherits Umbraco.Web.Mvc.UmbracoViewPage
@using Current = Umbraco.Web.Composing.Current;
@{
    var pageSize = 10;
    var pageIndex = int.Parse(Request.QueryString["page"]);
    var search = Current.PublishedContentQuery.Search(
        Request.QueryString["query"],
        pageIndex * pageSize,   // skip
        pageSize,               // take
        out var totalRecords);
}<div><h3>Search Results</h3><ul>
        @foreach (var result in search)
        {<li>
                Id: @result.Content.Id<br/>
                Name: @result.Content.Name<br />
                Score: @result.Score</li>
        }</ul></div>

Simple search with cultures

Another optional parameter you might have noticed is the culture parameter. The docs state this about the culture parameter:

When the culture is not specified or is *, all cultures are searched. To search for only invariant documents and fields use null. When searching on a specific culture, all culture specific fields are searched for the provided culture and all invariant fields for all documents. While enumerating results, the ambient culture is changed to be the searched culture.

What this is saying is that if you aren’t using culture variants in Umbraco then don’t worry about it. But if you are, you will also generally not have to worry about it either! What?! By default the simple Search method will use the “ambient” (aka ‘Current’) culture to search and return data. So if you are currently browsing your “fr-FR” culture site this method will automatically only search for your data in your French culture but will also search on any invariant (non-culture) data. And as a bonus, the IPublishedContent returned also uses this ambient culture so any values you retrieve from the content item without specifying the culture will just be the ambient/default culture.

So why is there a “culture” parameter? It’s just there in case you want to search on a specific culture instead of relying on the ambient/current one.

Search with IQueryExecutor

IQueryExecutor is the resulting object created when creating a query with the Examine fluent API. This means you can build up any complex Examine query you want, even with raw Lucene, and then pass this query to one of the IPublishedContentQuery.Search overloads and you’ll get all the goodness of the above queries. There’s also paging overloads with IQueryExecutor too. To further expand on the above example:

@inherits Umbraco.Web.Mvc.UmbracoViewPage
@using Current = Umbraco.Web.Composing.Current;
@{
    // Get the external index with error checking
    if (ExamineManager.Instance.TryGetIndex(
        Constants.UmbracoIndexes.ExternalIndexName, out var index))
    {
        throw new InvalidOperationException(
            $"No index found with name {Constants.UmbracoIndexes.ExternalIndexName}");
    }

    // build an Examine query
    var query = index.GetSearcher().CreateQuery()
        .GroupedOr(new [] { "pageTitle", "pageContent"},
            Request.QueryString["query"].MultipleCharacterWildcard());


    var pageSize = 10;
    var pageIndex = int.Parse(Request.QueryString["page"]);
    var search = Current.PublishedContentQuery.Search(
        query,                  // pass the examine query in!
        pageIndex * pageSize,   // skip
        pageSize,               // take
        out var totalRecords);
}

<div><h3>Search Results</h3><ul>
        @foreach (var result in search)
        {<li>
                Id: @result.Content.Id<br/>
                Name: @result.Content.Name<br />
                Score: @result.Score</li>
        }</ul></div>

The base interface of the fluent parts of Examine’s queries are IQueryExecutor so you can just pass in your query to the method and it will work.

Recap

The IPublishedContentQuery.Search overloads are listed in the API docs, they are:

  • Search(String term, String culture, String indexName)
  • Search(String term, Int32 skip, Int32 take, out Int64 totalRecords, String culture, String indexName)
  • Search(IQueryExecutor query)
  • Search(IQueryExecutor query, Int32 skip, Int32 take, out Int64 totalRecords)

Should you always use this instead of using Examine directly? As always it just depends on what you are doing. If you need a ton of flexibility with your search results than maybe you want to use Examine’s search results directly but if you want simple and quick access to IPublishedContent results, then these methods will work great.

Does this all work with ExamineX ? Absolutely!! One of the best parts of ExamineX is that it’s completely seamless. ExamineX is just an index implementation of Examine itself so all Examine APIs and therefore all Umbraco APIs that use Examine will ‘just work’.

Spatial Search with Examine and Lucene

$
0
0

I was asked about how to do Spatial search with Examine recently which sparked my interest on how that should be done so here’s how it goes…

Examine’s default implementation is Lucene so by default whatever you can do in Lucene you can achieve in Examine by exposing the underlying Lucene bits. If you want to jump straight to code, I’ve created a couple of unit tests in the Examine project.

Source code as documentation

Lucene.Net and Lucene (Java) are more or less the same. There’s a few API and naming conventions differences but at the end of the day Lucene.Net is just a .NET port of Lucene. So pretty much any of the documentation you’ll find for Lucene will work with Lucene.Net just with a bit of tweaking. Same goes for code snippets in the source code and Lucene and Lucene.Net have tons of examples of how to do things. In fact for Spatial search there’s a specific test example for that.

So we ‘just’ need to take that example and go with it.

Firstly we’ll need the Lucene.Net.Contrib package:

Install-Package Lucene.Net.Contrib -Version 3.0.3

Indexing

The indexing part doesn't really need to do anything out of the ordinary from what you would normally do. You just need to get either latitude/longitude or x/y (numerical) values into your index. This can be done directly using a ValueSet when you index and having your field types set as numeric or it could be done with the DocumentWriting event which gives you direct access to the underlying Lucene document. 

Strategies

For this example I’m just going to stick with simple Geo Spatial searching with simple x/y coordinates. There’s different “stategies” and you can configure these to handle different types of spatial search when it’s not just as simple as an x/y distance calculation. I was shown an example of a Spatial search that used the “PointVectorStrategy” but after looking into that it seems like this is a semi deprecated strategy and even one of it’s methods says: “//TODO this is basically old code that hasn't been verified well and should probably be removed” and then I found an SO article stating that “RecursivePrefixTreeStrategy” was what should be used instead anyways and as it turns out that’s exactly what the java example uses too.

If you need some more advanced Spatial searching then I’d suggest researching some of the strategies available, reading the docs  and looking at the source examples. There’s unit tests for pretty much everything in Lucene and Lucene.Net.

Get the underlying Lucene Searcher instance

If you need to do some interesting Lucene things with Examine you need to gain access to the underlying Lucene bits. Namely you’d normally only need access to the IndexWriter which you can get from LuceneIndex.GetIndexWriter() and the Lucene Searcher which you can get from LuceneSearcher.GetSearcher().

// Get an index from the IExamineManager
if (!examineMgr.TryGetIndex("MyIndex", out var index))
    throw new InvalidOperationException("No index found with name MyIndex");
// We are expecting this to be a LuceneIndex
if (!(index is LuceneIndex luceneIndex))
    throw new InvalidOperationException("Index MyIndex is not a LuceneIndex");

// If you wanted a LuceneWriter, here's how:
//var luceneWriter = luceneIndex.GetIndexWriter();

// Need to cast in order to expose the Lucene bits
var searcher = (LuceneSearcher)luceneIndex.GetSearcher();

// Get the underlying Lucene Searcher instance
var luceneSearcher = searcher.GetLuceneSearcher();

Do the search

Important! Latitude/Longitude != X/Y

The Lucene GEO Spatial APIs take an X/Y coordinates, not latitude/longitude and a common mistake is to just use them in place but that’s incorrect and they are actually opposite so be sure you swap tham. Latitude = Y, Longitude = X. Here’s a simple function to swap them:

private void GetXYFromCoords(double lat, double lng, out double x, out double y)
{
    // change to x/y coords, longitude = x, latitude = y
    x = lng;
    y = lat;
}

Now that we have the underlying Lucene Searcher instance we can search however we want:

// Create the Geo Spatial lucene objects
SpatialContext ctx = SpatialContext.GEO;
int maxLevels = 11; //results in sub-meter precision for geohash
SpatialPrefixTree grid = new GeohashPrefixTree(ctx, maxLevels);
RecursivePrefixTreeStrategy strategy = new RecursivePrefixTreeStrategy(grid, GeoLocationFieldName);

// lat/lng of Sydney Australia
var latitudeSydney = -33.8688;
var longitudeSydney = 151.2093;
            
// search within 100 KM
var searchRadiusInKm = 100;

// convert to X/Y
GetXYFromCoords(latitudeSydney, longitudeSydney, out var x, out var y);

// Make a circle around the search point
var args = new SpatialArgs(
    SpatialOperation.Intersects,
    ctx.MakeCircle(x, y, DistanceUtils.Dist2Degrees(searchRadiusInKm, DistanceUtils.EARTH_MEAN_RADIUS_KM)));

// Create the Lucene Filter
var filter = strategy.MakeFilter(args);

// Create the Lucene Query
var query = strategy.MakeQuery(args);

// sort on ID
Sort idSort = new Sort(new SortField(LuceneIndex.ItemIdFieldName, SortField.INT));
TopDocs docs = luceneSearcher.Search(query, filter, MaxResultDocs, idSort);

// iterate raw lucene results
foreach(var doc in docs.ScoreDocs)
{
    // TODO: Do something with result
}

Filter vs Query?

The above code creates both a Filter and a Query that is being used to get the results but the SpatialExample just uses a “MatchAllDocsQuery” instead of what is done above. Both return the same results so what is happening with “strategy.MakeQuery”? It’s creating a ConstantScoreQuery which means that the resulting document “Score” will be empty/same for all results. That’s really all this does so it’s optional but really when searching on only locations with no other data Score doesn’t make a ton of sense. It is possible however to mix Spatial search filters with real queries.

Next steps

You’ll see above that the ordering is by Id but probably in a lot of cases you’ll want to sort by distance. There’s examples of this in the Lucene SpatialExample linked above and there’s a reference to that in this SO article too, the only problem is those examples are for later Lucene versions than the current Lucene.Net 3.x. But if there’s a will there’s a way and I’m sure with some Googling, code researching and testing you’ll be able to figure it out :)

The Examine docs pages need a little love and should probably include this info. The docs pages are just built in Jekyll and located in the /docs folder of the Examine repository. I would love any help with Examine’s docs if you’ve got a bit of time :)

As far as Examine goes though, there’s actually custom search method called “LuceneQuery” on the “LuceneSearchQueryBase” which is the object created when creating normal Examine queries with CreateQuery(). Using this method you can pass in a native Lucene Query instance like the one created above and it will manage all of the searching/paging/sorting/results/etc… for you so you don’t have to do some of the above manual work. However there is currently no method allowing a native Lucene Filter instances to be passed in like the one created above. Once that’s in place then some of the lucene APIs above wont be needed and this can be a bit nicer. Then it’s probably worthwhile adding another Nuget project like Examine.Extensions which can contain methods and functionality for this stuff, or maybe the community can do something like that just like Callum has done for Examine Facets.  What do you think?

How to change HttpRequest.IsSecureConnection

$
0
0

This post is for ASP.NET Framework, not ASP.NET Core

This is an old problem that is solved in dozens of different ways…

Typically in an ASP.NET Framework site when you need to check if the request is running in HTTPS you would do something like HttpContext.Request.IsSecureConnection. But this value won’t return the anticipated value if your site is running behind a proxy or load balancer which isn’t forwarding HTTPS traffic and instead is forwarding HTTP traffic. This is pretty common and the way people deal with it is to check some special headers, which will vary depending on the load balancer you are using. The primary one is HTTP_X_FORWARDED_PROTO but there are others too like: X-Forwarded-Protocol, X-Forwarded-Ssl, X-Url-Scheme , and the expected values for each are slightly different too.

So if you can’t rely on HttpContext.Request.IsSecureConnection then you’ll probably make an extension method, or better yet an abstraction to deal with checking if the request is HTTPS. That’s totally fine but unfortunately you can’t rely on all of the dependencies your website uses to deal with this scenario. You’d also need to be able to configure them all to possibly handle some weird header scheme that your proxy/load balancer uses.

Aha! HttpRequestBase is abstract

If you are using MVC you’ll probably know that the HttpContext.Request within a controller is HttpRequestBase which is an abstract class where it’s possible to re-implement IsSecureConnection. Great, that sounds like a winner! Unfortunately this will only get you as far as being able to replace that value within your own controllers, this will still not help you with the dependencies your website uses.

And controllers aren’t the only thing you might need to worry about. You might have some super old ASP.NET Webforms or other code lying around using HttpContext.Current.Request.IsSecureConnection which is based on the old HttpRequest object which cannot be overridden.

So how does the default HttpContext.Current get this value?

The HttpContextBase is based on HttpContextWrapper which simply wraps HttpContext.Current. This is what is passed to your MVC controllers. As for HttpContext.Current, this is the source of all of this data and with a bit (a LOT) of hacking you can actually change this value.

The HttpContext.Current is actually a set-able singleton value. The constructor of HttpContext has 2x overloads, one that takes in a request/response object and another that accepts something called HttpWorkerRequest. So it is possible (sort of) to construct a new HttpContext instance that wraps the old one … so can we change this value? Yes!

HttpWorkerRequest is an abstract class and all methods are overridable so if we can access the underlying default HttpWorkerRequest (which is IIS7WorkerRequest) from the current context, we could wrap it and return anything we want for IsSecureConnection. This is not a pretty endeavor but it can be done.

Wrapping the HttpContext

I created a gist to show this. The usage is easy, just create an IHttpModule and replace the HttpContext by using a custom HttpWorkerRequest instance that accepts a delegate to return whatever you want for IsSecureConnection:


Now to create the wrapper, there’s a ton of methods and properties to override:


So what about OWIN?

Owin is easy to take care of, it’s OwinContext.Request.IsSecure is purely based on whether or not the scheme is https and the .Scheme property is settable:


Does this all actually work?

This was an experiment to see how possible this is and based on my rudimentary tests, yes it works. I have no idea if this will have some strange side affects but in theory its all just wrapping what normally executes. There will be a small performance penalty because this is going to create a couple of new objects each request and use a reflection call but I think that will be very trivial.

Let me know if it works for you!

Allowing dynamic SupportedCultures in RequestLocalizationOptions

$
0
0

The documented usage of RequestLocalizationOptions in ASP.NET 5/Core is to assign a static list of SupportedCultures since ASP.NET is assuming you’ll know up-front what cultures your app is supporting. But what if you are creating a CMS or another web app that allows users to include cultures dynamically?

This isn’t documented anywhere but it’s certainly possible. RequestLocalizationOptions.SupportedCultures is a mutable IList which means that values can be added/removed at runtime if you really want.

Create a custom RequestCultureProvider

First thing you need is a custom RequestCultureProvider. The trick is to pass in the RequestLocalizationOptions into it’s ctor so you can dynamically modify the SupportedCultures when required.

public class MyCultureProvider : RequestCultureProvider
{
    private readonly RequestLocalizationOptions _localizationOptions;
    private readonly object _locker = new object();

    // ctor with reference to the RequestLocalizationOptions
    public MyCultureProvider(RequestLocalizationOptions localizationOptions)
        => _localizationOptions = localizationOptions;

    public override Task<ProviderCultureResult> DetermineProviderCultureResult(HttpContext httpContext)
    {
        // TODO: Implement GetCulture() to get a culture for the current request
        CultureInfo culture = GetCulture(); 

        if (culture is null)
        {
            return NullProviderCultureResult;
        }

        lock (_locker)
        {
            // check if this culture is already supported
            var cultureExists = _localizationOptions.SupportedCultures.Contains(culture);

            if (!cultureExists)
            {
                // If not, add this as a supporting culture
                _localizationOptions.SupportedCultures.Add(culture);
                _localizationOptions.SupportedUICultures.Add(culture);
            } 
        }

        return Task.FromResult(new ProviderCultureResult(culture.Name));
    }
}

Add your custom culture provider

You can configure RequestLocalizationOptions in a few different ways, this example registers a custom implementation of IConfigureOptions<RequestLocalizationOptions> into DI

public class MyRequestLocalizationOptions : IConfigureOptions<RequestLocalizationOptions>
{
    public void Configure(RequestLocalizationOptions options)
    {
        // TODO: Configure other options parameters

        // Add the custom provider,
        // in many cases you'll want this to execute before the defaults
        options.RequestCultureProviders.Insert(0, new MyCultureProvider(options));
    }
}

Then just register these options: Services.ConfigureOptions<MyRequestLocalizationOptions>();

That’s it, now you can have dynamic SupportedCultures in your app!

How to execute one Controller Action from another in ASP.NET 5

$
0
0

This will generally be a rare thing to do but if you have your reasons to do it, then this is how…

In Umbraco one valid reason to do this is due to how HTTP POSTs are handled for forms. Traditionally an HTML form will POST to a specific endpoint, that endpoint will handle the validation (etc), and if all is successful it will redirect to another URL, else it will return a validation result on the current URL (i.e. PRG POST/REDIRECT/GET). In the CMS world this may end up a little bit weird because URLs are dynamic. POSTs in theory should just POST to the current URL so that if there is a validation result, this is still shown on the current URL and not a custom controller endpoint URL. This means that there can be multiple controllers handling the same URL, one for GET, another for POST and that’s exactly what Umbraco has been doing since MVC was enabled in it many years ago. For this to work, a controller is selected during the dynamic route to handle the POST (a SurfaceController in Umbraco) and if successful, typically the developer will use: returnRedirectToCurrentUmbracoPage (of type RedirectToUmbracoPageResult) or if not successful will use: returnCurrentUmbracoPage (of type UmbracoPageResult). The RedirectToUmbracoPageResult is easy to handle since this is just a redirect but the UmbracoPageResult is a little tricky because one controller has just handled the POST request but now it wants to return a page result for the current Umbraco page which is handled by a different controller.

IActionInvoker

The concept is actually pretty simple and the IActionInvoker does all of the work. You can create an IActionInvoker from the IActionInvokerFactory which needs an ActionContext. Here’s what the ExecuteResultAsync method of a custom IActionResult could look like to do this:

public async Task ExecuteResultAsync(ActionContext context)
{
    // Change the route values to match the action to be executed
    context.RouteData.Values["controller"] = "Page";
    context.RouteData.Values["action"] = "Index";

    // Create a new context and excute the controller/action
    // Copy the action context - this also copies the ModelState
    var renderActionContext = new ActionContext(context)
    {
        // Normally this would be looked up via the EndpointDataSource
        // or using the IActionSelector
        ActionDescriptor = new ControllerActionDescriptor
        {
            ActionName = "Index",
            ControllerName = "Page",
            ControllerTypeInfo = typeof(PageController).GetTypeInfo(),
            DisplayName = "PageController.Index"
        }
    };

    // Get the factory
    IActionInvokerFactory actionInvokerFactory = context.HttpContext
                .RequestServices
                .GetRequiredService<IActionInvokerFactory>();

    // Create the invoker
    IActionInvoker actionInvoker = actionInvokerFactory.CreateInvoker(renderActionContext);

    // Execute!
    await actionInvoker.InvokeAsync();
}

That’s pretty must the gist of it. The note about the ControllerActionDescriptor is important though, it’s probably best to not manually create these since they are already created with all of your routing. They can be queried and resolved in a few different ways such as interrogating the EndpointDataSource or using the IActionSelector. This execution will execute the entire pipeline for the other controller including all of it’s filters, etc…

Auto upgrade your Nuget packages with Azure Pipelines or GitHub Actions

$
0
0

Before we start I just want to preface this with some 🔥 warnings 🔥

  • This works for me, it might not work for you
  • To get this working for you, you may need to tweak some of the code referenced
  • This is not under any support or warranty by anyone
  • Running Nuget.exe update command outside of Visual Studio will overwrite your files so there is a manual review process (more info below)
  • This is only for ASP.NET Framework using packages.config– Yes I know that is super old and I should get with the times, but this has been an ongoing behind the scenes project of mine for a long time. When I need this for Package Reference projects, ASP.NET Core/5, I’ll update it but there’s nothing stopping you from tweaking this to work for you
  • This only works for a specified csproj, not an entire sln – it could work for that but I’ve not tested, there would be a few tweaks to make that work
  • This does not yet work for GitHub actions but the concepts are all here and could probably very easily be convertedUPDATE: This works now!

Now that’s out of the way …

How do I do it?

With a lot of PowerShell :) This also uses a few methods from the PowerShellForGitHub project.

The process is:

  • Run a pipeline/action on a schedule (i.e. each day)
  • This checks against your source code for the installed version for a particular package
  • Then it checks with Nuget (using your Nuget.config file) to see what the latest stable version is
  • If there’s a newer version:
  • Create a new branch
  • Run a Nuget update against your project
  • Build the project
  • Commit the changes
  • Push the changes
  • Create a PR for review

Azure Pipelines/GitHub Actions YAML

The only part of the YAML that needs editing is the variables, here's what they mean:

  • ProjectFile = The relative path to your csproj that you want to upgrade
  • PackageFile = The relative path to your packages.config file for this project
  • PackageName = The Nuget package name you want upgraded
  • GitBotUser = The name used for the Git commits
  • GitBotEmail = The email used for the Git commits

For Azure Pipelines, these are also required:

Then there are some variables to assist with testing:

  • DisableUpgradeStep = If true will just check if there’s an upgrade available and exit
  • DisableCommit = If true will run the upgrade and will exit after that (no commit, push or PR)
  • DisablePush = If true will run the upgrade + commit and will exit after that (no push or PR)
  • DisablePullRequest = If true will run the upgrade + commit + push and will exit after that (no PR)

Each step in the yaml build more or less either calls Git commands or PowerShell functions. The PowerShell functions are loaded as part of a PowerShell Module which is committed to the repository. This module’s functions are auto-loaded by PowerShell because the first step configures the PowerShell environment variable PSModulePath to include the custom path. Once that is in place, all functions exposed by the module are auto-loaded.

In these examples you’ll see that I’m referencing Umbraco Cloud names and that’s because I’m using this on Umbraco Cloud for my own website and the examples are for the UmbracoCms package. But this should in theory work for all packages!

Show me the code

The code for all of this is here in a new GitHub repo and here’s how you use it:

You can copy the folder structure in the repository as-is. Here's an example of what my site's repository folder structure is to make this work (everything except the src folder is in the GitHub repo above):

  • [root]
    • auto-upgrader.devops.yml (If you are using Azure Pipelines)
    • .github
      • workflows
        • auto-upgrader.gh.yml (If you are using GitHub Actions)
    • build
      • PowershellModules
        • AutoUpgradeFunctions.psd1
        • AutoUpgradeFunctions.psm1
        • AutoUpgradeFunctions
    • src
      • Shazwazza.Web
        • Shazwazza.Web.csproj
        • packages.config

All of the steps have descriptive display names and it should be reasonably self documenting.

The end result is a PR, here’s one that was generated by this process:

Nuget overwrites

Nuget.exe works differently than Nuget within Visual Studio’s Package Manager Console. All of those special commands like Install-Package, Update-Package, etc… are all PowerShell module commands built into Visual Studio and they are able to work with the context of Visual Studio. This allows those commands to try to be a little smarter when running Nuget updates and also allows the legacy Nuget features like running PowerShell scripts on install/update to run. This script just uses Nuget.exe and it’s less smart especially for these legacy .NET Framework projects. As such, it will just overwrite all files in most cases (it does detect file changes it seems but isn’t always accurate).

With that 🔥 warning 🔥it is very important to make sure you review the changed files in the PR and revert or adjust any changes you need before applying the PR.

You’ll see a note in the PowerShell script about Nuget overwrites. There are other options that can be used like "Ignore" and "IgnoreAll" but all my tests have showed that for some reason this setting will end up deleting a whole bunch of files so the default overwrite setting is used.

Next steps

Get out there and try it! Would love some feedback on this if/when you get a change to test it.

PackageReference support with .NET Framework projects could also be done (but IMO this is low priority) along with being able to upgrade the entire SLN instead of just the csproj.

Then perhaps some attempts at getting a NET Core/5 version of this running. In theory that will be easier since it will mostly just be dotnet commands.


Articulate 4.3.0 with support for markdown code snippets and syntax highlighting

$
0
0

I'm happy to announce that Articulate 4.3.0 is shipped and includes a great new feature that I've been wanting/needing:

The ability to create markdown based posts with support for GitHub style code fences/snippets and syntax highlighting for (almost) any coding language.See #341.

Now I can finally do away with using Live Writer for my blog and having to manually add css classes to the html for syntax highlighting... yes that's what I've been doing 🤦‍♂️

Upgrading

Once you've updated to the 4.3.0 release, you'll probably need to change the Property Editor of the Articulate Markdown Data Type to be Articulate Markdown editor since it's most likely currently configured to the default/basic Umbraco markdown editor.

You'll then need to update your Post.cshtml theme file to include the correct Prism dependencies. For example, here's the update/diff to the VAPOR theme which adds these dependencies. It's just ensuring that the Prism stylesheet is added to the header and the Prism.js dependencies are appended to the Post.cshtml file.

Once that's all done, your set!

Creating markdown posts

If you didn't already know, Articulate has always had a browser based markdown editor to create posts. You can simply go to your Articulate root URL and go to the path: a-new to load the markdown editor. Previously this editor would require you to authenticate at the end of writing your post (if you weren't already authenticated) but now it requires authentication up-front.

Once it's loaded, it's just a text editor and you can use your all the normal markdown syntax. You can even upload or take photos with the editor 😀

Of course you can just use the back office markdown editor to create or update posts too but I find for quickly getting a post written and published it's faster to use the /a-new editor... and it works on mobile.

Using code fences with syntax highlighting

GitHub's documentation shows how this works. The typical code fence is 3x back-ticks above and below your code snippet. If you want to add language specific syntax highlighting you can use 3x back-ticks + the language name/alias. For example, c# would be: ```cs (or c# or csharp) and JavaScript would be ```js. GitHub's implementation is different from what Articulate uses so it may not be a perfect 1:1 result but should be fairly close. Articulate is using a combination of:

Rendered Examples

There are just rendered examples based on the default prism styles. I wrote this blog post with the Articulate markdown editor so you can see the results.

Here's an example of a rendered csharp code fence:

/// <summary>
/// This is an example of the ArticulateComposer
/// </summary>
[RuntimeLevel(MinLevel = RuntimeLevel.Run)]
public class ArticulateComposer : IUserComposer
{
    public void Compose(Composition composition)
    {
        composition.RegisterUnique<ArticulateRoutes>();
        composition.RegisterUnique<ContentUrls>();
        composition.RegisterUnique<ArticulateDataInstaller>();
        composition.RegisterUnique<ArticulateTempFileSystem>(
            x => new ArticulateTempFileSystem("~/App_Data/Temp/Articulate"));

        // TODO: Register remaining services....
    }
}

Here's an example of a rendered js code fence:

(function () {'use strict';

    /**
     * An example of the articulateOptionsManagementController
     * @param {any} $scope
     * @param {any} $element
     * @param {any} $timeout
     */
    function articulateOptionsManagementController($scope, $element, $timeout) {

        var vm = this;
        vm.viewState = "list";
        vm.selectedGroup = null;
        // TODO: Fill in the rest....
    }

    var articulateOptionsMgmtComponent = {
        templateUrl: '../../App_Plugins/Articulate/BackOffice/PackageOptions/articulatemgmt.html',        
        controllerAs: 'vm',
        controller: articulateOptionsManagementController
    };

    angular.module("umbraco")
        .component('articulateOptionsMgmt', articulateOptionsMgmtComponent);
})();

Here's an example of a rendered ruby code fence:

class Dog  
  def initialize(breed, name)  
    # Instance variables  
    @breed = breed  
    @name = name  
  end  
  def bark  
    puts 'Ruff! Ruff!'  
  end  
  def display  
    puts "I am of #{@breed} breed and my name is #{@name}"  
  end  
end

Can I disable Examine indexes on Umbraco front-end servers?

$
0
0

In Umbraco v8, Examine and Lucene are only used for the back office searches, unless you specifically use those APIs for your front-end pages. I recently had a request to know if it’s possible to disable Examine/Lucene for front-end servers since they didn’t use Examine/Lucene APIs at all on their front-end pages… here’s the answer

Why would you want this?

If you are running a Load Balancing setup in Azure App Service then you have the option to scale out (and perhaps you do!). In this case, you need to have the Examine configuration option of:

<add key="Umbraco.Examine.LuceneDirectoryFactory" 
          value="Examine.LuceneEngine.Directories.TempEnvDirectoryFactory, Examine" />

This is because each scaled out worker is running from the same network share file system. Without this setting (or with the SyncTempEnvDirectoryFactory setting) it would mean that each worker will be trying to write Lucene file based indexes to the same location which will result in corrupt indexes and locked files. Using the TempEnvDirectoryFactory means that the indexes will only be stored on the worker's local 'fast drive' which is in it's %temp% folder on the local (non-network share) hard disk.

When a site is moved or provisioned on a new worker the local %temp% location will be empty so Lucene indexes will be rebuilt on startup for that worker. This will occur when Azure moves a site or when a new worker comes online from a scale out action. When indexes are rebuilt, the worker will query the database for the data and depending on how much data you have in your Umbraco installation, this could take a few minutes which can be problematic. Why? Because Umbraco v8 uses distributed SQL locks to ensure data integrity and during these queries a content lock will be created which means other back office operations on content will need to wait. This can end up with SQL Lock timeout issues. An important thing to realize is that these rebuild queries will occur for all new workers, so if you scaled out from 1 to 10, that is 9 new workers coming online at the same time.

How to avoid this problem?

If you use Examine APIs on your front-end, then you cannot just disable Examine/Lucene so the only reasonable solution is to use an Examine implementation that uses a hosted search service like ExamineX

If you don't use Examine APIs on your front-ends then it is a reasonable solution to disable Examine/Lucene on the front-ends to avoid this issue. To do that, you would change the default Umbraco indexes to use an in-memory only store and prohibit data from being put into the indexes. Then disable the queries that execute when Umbraco tries to re-populate the indexes.

Show me the code

First thing is to replace the default index factory. This new one will change the underlying Lucene directory for each index to be a RAMDirectory and will also disable the default Umbraco event handling that populates the indexes. This means Umbraco will not try to update the index based on content, media or member changes.

public class InMemoryExamineIndexFactory : UmbracoIndexesCreator
{
    public InMemoryExamineIndexFactory(
        IProfilingLogger profilingLogger,
        ILocalizationService languageService,
        IPublicAccessService publicAccessService,
        IMemberService memberService,
        IUmbracoIndexConfig umbracoIndexConfig)
        : base(profilingLogger, languageService, publicAccessService, memberService, umbracoIndexConfig)
    {
    }

    public override IEnumerable<IIndex> Create()
    {
        return new[]
        {
            CreateInternalIndex(),
            CreateExternalIndex(),
            CreateMemberIndex()
        };
    }

    // all of the below is the same as Umbraco defaults, except
    // we are using an in-memory Lucene directory.

    private IIndex CreateInternalIndex()
        => new UmbracoContentIndex(
            Constants.UmbracoIndexes.InternalIndexName,
            new RandomIdRamDirectory(), // in-memory dir
            new UmbracoFieldDefinitionCollection(),
            new CultureInvariantWhitespaceAnalyzer(),
            ProfilingLogger,
            LanguageService,
            UmbracoIndexConfig.GetContentValueSetValidator())
        {
            EnableDefaultEventHandler = false
        };

    private IIndex CreateExternalIndex()
        => new UmbracoContentIndex(
            Constants.UmbracoIndexes.ExternalIndexName,
            new RandomIdRamDirectory(), // in-memory dir
            new UmbracoFieldDefinitionCollection(),
            new StandardAnalyzer(Lucene.Net.Util.Version.LUCENE_30),
            ProfilingLogger,
            LanguageService,
            UmbracoIndexConfig.GetPublishedContentValueSetValidator())
        {
            EnableDefaultEventHandler = false
        };

    private IIndex CreateMemberIndex()
        => new UmbracoMemberIndex(
            Constants.UmbracoIndexes.MembersIndexName,
            new UmbracoFieldDefinitionCollection(),
            new RandomIdRamDirectory(), // in-memory dir
            new CultureInvariantWhitespaceAnalyzer(),
            ProfilingLogger,
            UmbracoIndexConfig.GetMemberValueSetValidator())
        {
            EnableDefaultEventHandler = false
        };

    // required so that each ram dir has a different ID
    private class RandomIdRamDirectory : RAMDirectory
    {
        private readonly string _lockId = Guid.NewGuid().ToString();
        public override string GetLockId()
        {
            return _lockId;
        }
    }
}

The next thing to do is to create no-op index populators to replace the Umbraco default ones. All these do is ensure they are not associated with any index and then just to be sure, does not execute any logic for population.

public class DisabledMemberIndexPopulator : MemberIndexPopulator
{
    public DisabledMemberIndexPopulator(
        IMemberService memberService,
        IValueSetBuilder<IMember> valueSetBuilder)
        : base(memberService, valueSetBuilder)
    {
    }

    public override bool IsRegistered(IIndex index) => false;
    public override bool IsRegistered(IUmbracoMemberIndex index) => false;
    protected override void PopulateIndexes(IReadOnlyList<IIndex> indexes) { }
}

public class DisabledContentIndexPopulator : ContentIndexPopulator
{
    public DisabledContentIndexPopulator(
        IContentService contentService,
        ISqlContext sqlContext,
        IContentValueSetBuilder contentValueSetBuilder)
        : base(contentService, sqlContext, contentValueSetBuilder)
    {
    }

    public override bool IsRegistered(IIndex index) => false;
    public override bool IsRegistered(IUmbracoContentIndex2 index) => false;
    protected override void PopulateIndexes(IReadOnlyList<IIndex> indexes) { }
}

public class DisabledPublishedContentIndexPopulator : PublishedContentIndexPopulator
{
    public DisabledPublishedContentIndexPopulator(
        IContentService contentService,
        ISqlContext sqlContext,
        IPublishedContentValueSetBuilder contentValueSetBuilder)
        : base(contentService, sqlContext, contentValueSetBuilder)
    {
    }

    public override bool IsRegistered(IIndex index) => false;
    public override bool IsRegistered(IUmbracoContentIndex2 index) => false;
    protected override void PopulateIndexes(IReadOnlyList<IIndex> indexes) { }
}

public class DisabledMediaIndexPopulator : MediaIndexPopulator
{
    public DisabledMediaIndexPopulator(
        IMediaService mediaService,
        IValueSetBuilder<IMedia> mediaValueSetBuilder) : base(mediaService, mediaValueSetBuilder)
    {
    }

    public override bool IsRegistered(IIndex index) => false;
    public override bool IsRegistered(IUmbracoContentIndex index) => false;
    protected override void PopulateIndexes(IReadOnlyList<IIndex> indexes) { }
}

Lastly, we just need to enable these services:

public class DisabledExamineComposer : IUserComposer
{
    public void Compose(Composition composition)
    {
        // replace the default
        composition.RegisterUnique<IUmbracoIndexesCreator, InMemoryExamineIndexFactory>();

        // replace the default populators
        composition.Register<MemberIndexPopulator, DisabledMemberIndexPopulator>(Lifetime.Singleton);
        composition.Register<ContentIndexPopulator, DisabledContentIndexPopulator>(Lifetime.Singleton);
        composition.Register<PublishedContentIndexPopulator, DisabledPublishedContentIndexPopulator>(Lifetime.Singleton);
        composition.Register<MediaIndexPopulator, DisabledMediaIndexPopulator>(Lifetime.Singleton);
    }
}

With that all in place, it means that no data will ever be looked up to rebuild indexes and Umbraco will not send data to be indexed. There is nothing here preventing data from being indexed though. For example, if you use the Examine APIs to update the index directly, that data will be indexed in memory. If you wanted to absolutely make sure no data ever went into the index, you would have to override some methods on the RAMDirectory.

Can I run Examine with RAMDirectory with data?

You might have realized with the above that if you don't replace the populators, you will essentially have Examine indexes in Umbraco running from RAMDirectory. Is this ok? Yes absolutely, but that entirely depends on your data set. If you have a large index, that means it will consume large amounts of memory which is typically not a good idea. But if you have a small data set, or you filter the index so that it remains small enough, then yes! You can certainly run Examine with an in-memory directory but this would still only be advised on your front-end/replica servers.

Easily lock out Umbraco back office users

$
0
0

Want an easy way to lock out all back office users?

Maybe you are performing an upgrade and want to make sure there’s no back office activity?

Here’s a handy script to do this


using System;
using Microsoft.Owin;
using Owin;
using Umbraco.Web;

[assembly: OwinStartup("AuthDisabledOwinStartup", typeof(MyWebsite.AuthDisabledOwinStartup))]

namespace MyWebsite
{
    public class AuthDisabledOwinStartup : UmbracoDefaultOwinStartup
    {
        protected override void ConfigureUmbracoAuthentication(IAppBuilder app)
        {
            //Don't do anything, this will mean all cookie authentication is disabled which means
            //that no requests from the back office user will be authenticated and therefore 
            //all requests will fail and the user will be logged out.
        }
    }
}

Now you can just update your web.config appSetting to

<add value="AuthDisabledOwinStartup" key="owin:appStartup"></add>

When you want to allow back office access again, just update your web.config with your original owin:appStartup value

Getting Umbraco to work with Azure Easy Auth

$
0
0

There’s a nifty feature in your Azure App Service that allows you to very quickly add authentication and authorization to your Azure website. You’ll see most folks calling this “Easy Auth” and there’s quite a few articles on the subject such as:

The good news is this all works the way you’d expect with an Umbraco website for front-end requests but unfortunately this doesn’t play nicely with the Umbraco back office … but it’s easy to configure Umbraco to work!

The problem

The problem is that if you turn on Easy Auth and try to log in to your Umbraco back office, the login will succeed but you’ll get 401 responses for other back office requests and essentially you’ll see a blank screen. The reason this happens is due to the way that Easy Auth works:

  • It activates an HttpModule in your site called EasyAuthAspNetThreadPrincipalModule
  • During the HttpModule.AuthenticateRequest stage it replaces the Thread.CurrentPrincipal with it’s own ClaimsPrincipal/ClaimsIdentity instance

Umbraco also sets the Thread.CurrentPrincipal.Identity during this phase but at the OWIN level which executes before the EasyAuthAspNetThreadPrincipalModule. Because the Easy Auth module replaces the principal/identity, it wipes out the one created by Umbraco. What it should do instead is check if the current principal is a ClaimsPrincipal and then add it’s identity to the identity collection instead of wiping out anything that is already there. If that were the case, everything would ‘just work’ but since it is not we have to work around this issue.

The solution

UPDATE!(19/04/18) - Chris Gillum who created Easy Auth got in touch with me on Twitter to share some handy (and fairly hidden) documentation for Easy Auth. Looks like another work around is to use the WEBSITE_AUTH_DISABLE_IDENTITY_FLOW appSetting which will prevent Easy Auth from setting the thread identity at all.

To work around this problem we need to tell Umbraco to perform it’s authentication procedure after the Easy Auth module runs which is actually pretty easy to do.

Create a new OWIN startup class:


[assembly: OwinStartup("MyOwinStartup", typeof(MyOwinStartup))]
namespace MyProject
{
    public class MyOwinStartup : Umbraco.Web.UmbracoDefaultOwinStartup
    {
    }
}

Update an appSetting in your web.config to tell OWIN to use your class:

<add key="owin:appStartup" value="MyOwinStartup" />

Override the method that configures Umbraco's authentication procedure and tell it to execute after the default Authentication stage, notice this code block is using PipelineStage.PostAuthenticate:


public class MyOwinStartup : Umbraco.Web.UmbracoDefaultOwinStartup
{
    protected override void ConfigureUmbracoAuthentication(IAppBuilder app)
    {
        app
            .UseUmbracoBackOfficeCookieAuthentication(ApplicationContext, PipelineStage.PostAuthenticate)
            .UseUmbracoBackOfficeExternalCookieAuthentication(ApplicationContext, PipelineStage.PostAuthenticate)
            .UseUmbracoPreviewAuthentication(ApplicationContext, PipelineStage.Authorize);
    }
}

That's it! Now the Umbraco back office will authenticate correctly with Azure Easy Auth turned on.

How I configure my Umbraco Cloud website to support Nuget packages

$
0
0

Disclaimer: This post is about how I have my own website setup. This is based on my own personal opinions and is not meant to be an Umbraco Cloud ‘best practices’ guide. I’ve written this post since it might help others who have the same requirements as I do.

My Requirements

For my simple website, I would like to manage all of my dependencies with Nuget, I don’t need anything compiled, don’t need class libraries and I don’t mind putting any required custom code into App_Code.

Umbraco Cloud provisions a deployment Git repository which for all intensive purposes is meant for deploying code between environments, not so much for a source code repository. That said, since my website is ultra simple and doesn’t contain any class library projects (etc…) I figured having an ASP.Net website project configured in the Umbraco Cloud repository would be fine. A website project is different from the standard web application project; a website doesn’t compile, it runs as-is which is suitable for the Umbraco Cloud Git repository since that’s exactly what the repository is made for: to host a deployed website that runs based on the files as-is.  I prefer working with web application projects normally but in this case my website is ultra simple and a website project will work just fine plus this allows me to have a Visual Studio project/solution that works fairly seamlessly with Umbraco Cloud.

How to set this up

There’s not a lot required to set this up but there are a couple ‘gotchas’, here’s the steps:

1) Clone your Umbraco Cloud Git repo

The first step is straight forward, you need to clone your Umbraco Cloud Git repository to your local machine

2) Open your Umbraco Cloud site as a Website in Visual Studio

Open Visual Studio, File –> Open –> Web site and choose the folder where your Umbraco Cloud site is cloned. This will open your Umbraco Cloud folder as a website project (at this point you could ctrl+F5 and it would run your site).

3) Save the sln file

You need to save the Visual Studio .sln file in order to have Nuget references, File –> Save localhost_1234.sln As…

This menu option is a bit odd and that’s because Visual Studio has created an in-memory .sln file which it’s auto-named to be localhost_PORT.sln

image

When you click on that, browse to your Umbraco Cloud Git repo folder and name the file something that makes more sense than localhost_PORT.sln.

4) Configure the Solution and Project to not build the website

This is optional but by default Visual Studio will try to build your website which means it’s going to try to precompile all views, etc… which not only can take some time but you will get false positive errors. So instead there’s 2 things to do: In Configuration Manager turn off the “Build” option for the website project and in the website project settings turn off building. Here’s how:

Build –> Configuration Manager opens a dialog, uncheck the Build checkbox for the website

image

Then right click the root of your website project and choose “Property Pages” and click on the “Build” navigation element. Then change the “Start action” to “No build” and un-check the “Build website as part of solution” checkbox

image

5) Create a Kudu .deployment file

Here’s one of the ‘gotchas’. Like Azure web apps, Umbraco Cloud also uses Kudu to perform some of it’s operations such as deploying a website from the Git repository to the hosting directory on the server. By default Kudu will copy the files in the deployment repository as-is to the hosting directory on the server (which is what we want)… that is until Kudu sees things like .sln or .csproj files in the root of the Git repository, then it tries to be clever and build things (which we don’t want).

So to tell Kudu to just deploy the files as-is, we create a special Kudu file at the repository root called .deployment (to be clear this file name starts with a dot!).

To create this, in your Visual Studio website project, right click the root click Add –> Add new item –> Choose Text File –> Enter the name .deployment 

Then add the following to this file:

[config]
project = .

and this tells Kudu to just deploy the files that are found in the repo.

6) Now you can add Nuget references

Once all of this is setup, you can add Nuget references to this website project like you would normally add Nuget references. At this point you might need to make a choice: Do you want to manage your Umbraco installation based on Nuget? In some cases you might not have a choice if you need to reference a Nuget package that has a dependency on Umbraco.Core. 

As it turns out this choice isn’t such a big deal but some things to be aware of. Since Umbraco Cloud auto-upgrades projects to the latest patch version, you might be concerned that your packages.config is going to get out of date… luckily Umbraco Cloud is clever and will auto-update this file to the version it just upgraded you too. This also goes for minor version upgrades that you perform on Umbraco Cloud. Since Umbraco Cloud auto-commits all of the upgraded files, it means you really don’t have to do anything.

7) You’ll need to commit the special *.dll.refresh files

Once you start using Nuget with a website project, you’ll notice a bunch of these *.dll.refresh files in your /bin directory. You’ll need to commit those. These are special marker files used by Visual Studio to know how to manage Nuget dependencies with a website project.

That's it!

The above setup is an easy way to setup a Visual Studio solution with a single website project that works seamlessly with Umbraco Cloud while allowing you to manage dependencies with Nuget.

But what if your solution is more complicated or you want to add class libraries, etc… ? There’s Umbraco documentation on how to configure this found here: https://our.umbraco.com/documentation/Umbraco-Cloud/Set-Up/Visual-Studio/, https://our.umbraco.com/documentation/Umbraco-Cloud/Set-Up/Working-With-Visual-Studio/  and the configuration there isn’t so different than the above except that the .sln file isn’t committed to the Umbraco Cloud Git deployment repository and instead exists in your own Git repository which in that case, the special .deployment file is not necessary.

Viewing all 183 articles
Browse latest View live